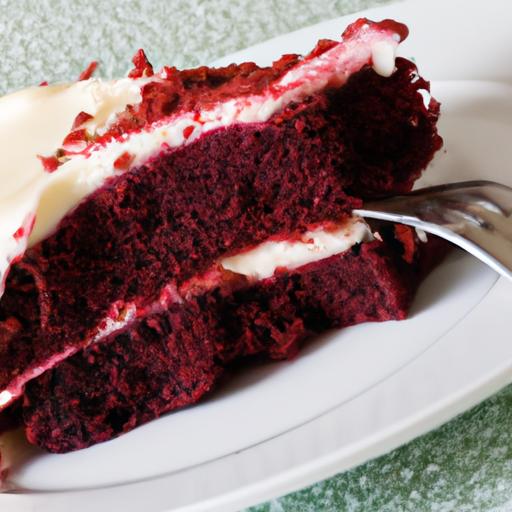

There’s something undeniably enchanting about a slice of red velvet cake-the striking crimson hue, the tender crumb, and that luscious swirl of cream cheese frosting that melts on your tongue. It’s a dessert that has won hearts for generations, balancing just the right hint of cocoa with a velvety texture that feels both nostalgic and indulgent. Whether you’re a seasoned baker or a curious newbie, mastering the ultimate red velvet cake recipe means unlocking a timeless classic that’s as beautiful too behold as it is irresistible to savor. Join us as we delve into this beloved confection’s secrets, guiding you step-by-step to create a cake that’s nothing short of perfection.
The Ultimate Red Velvet Cake Recipe captures the magic of a rich, velvety crumb paired with a luscious cream cheese frosting that has delighted dessert lovers for generations. Originating from Southern kitchens and immortalized by iconic bakeries, this cake thrives on its delicate balance of flavor, texture, and that signature ruby-red hue. Every bite tells a story, and mastering these ingredients and techniques guarantees a showstopping centerpiece for any occasion.
Prep and Cook Time
- Preparation: 25 minutes
- Cooking: 30 minutes
- Cooling & Frosting: 1 hour
Yield
Serves 12 generous slices
Difficulty Level
Medium – approachable for keen home bakers looking to elevate thier dessert game
Ingredients That Make the perfect Red Velvet Cake Stand out
- 2 ½ cups all-purpose flour, sifted – ensures a tender crumb without weighing down the batter
- 1 ½ cups granulated sugar – for a just-right sweetness that enhances the cake’s mild cocoa notes
- 1 teaspoon baking soda – activates the classic slight tang when combined with vinegar
- 1 teaspoon fine salt – balances sweetness and enriches flavor depth
- 1 teaspoon unsweetened cocoa powder – added sparingly for subtle chocolate undertones
- 1 cup buttermilk, at room temperature – the hallmark ingredient that creates moistness and tender texture
- 1 cup vegetable oil - keeps layers luxuriously moist without heaviness
- 2 large eggs, at room temperature – provide structure and stability
- 1 tablespoon distilled white vinegar – enhances the deep red color and elevates tenderness
- 2 teaspoons pure vanilla extract – rounds out flavor with floral sweetness
- 2 tablespoons red food coloring (liquid or gel) - rich, vibrant color essential for presentation
Mastering the Art of Moist and Fluffy Layers
- Preheat the oven to 350°F (175°C) and prepare two 9-inch round cake pans by greasing and lining with parchment paper to prevent sticking.
- Whisk together dry ingredients: sift flour, cocoa powder, baking soda, salt, and set aside to ensure even distribution for consistency.
- In a separate bowl, blend sugar and oil until fully combined. Add eggs one at a time, beating well after each addition for a smooth, glossy batter.
- Stir in the vanilla, vinegar, and red food coloring – this mixture will turn a striking shade of red, signaling you’re on the right track.
- Alternate adding dry ingredients and buttermilk to the wet mixture, beginning and ending with dry. Fold gently to avoid overmixing, which can toughen the crumb.
- Divide batter evenly between pans and smooth the surface with a spatula for even rising.
- Bake for 28-32 minutes, until a toothpick inserted in the center comes out with a few moist crumbs. Overbaking dulls moisture, so monitor closely after 28 minutes.
- Cool the cakes in pans for 10 minutes, then transfer to wire racks to cool completely before frosting – this prevents melting and sliding during assembly.
Decadent Cream Cheese Frosting Tips for a Silky Finish
- Use full-fat cream cheese and unsalted butter,both softened to room temperature to avoid lumps and ensure perfect emulsion.
- Beat butter and cream cheese together until fluffy, about 2-3 minutes. This aeration creates a light, silky texture.
- Gradually add sifted powdered sugar to prevent gritty texture and achieve smooth sweetness.
- Add a splash of pure vanilla extract to brighten the frosting’s richness.
- If frosting feels too thick, add a teaspoon of heavy cream or milk gradually until desired consistency is reached for easy spreading or piping.
Expert Techniques to Elevate Your Red Velvet Presentation
- Level cake layers with a serrated knife or cake leveler to ensure even stacking and professional appearance.
- Apply a crumb coat, a thin layer of frosting covering the entire cake to trap crumbs before the final frosting layer goes on smoothly.
- Use an offset spatula and bench scraper for sharp edges and smooth sides, lending a clean, elegant finish perfect for showcasing the vibrant red color against the creamy white frosting.
- For garnish, sprinkle with finely chopped toasted pecans or white chocolate shavings to add texture and visual interest without overpowering the flavor.
- Decorate with edible flowers or a dusting of cocoa powder for a rustic yet refined touch, ideal for special occasions.
Chef’s Notes
- Substitution tip: If buttermilk isn’t available, mix 1 cup milk with 1 tablespoon lemon juice or vinegar and let sit 5 minutes before using.
- Make-ahead: bake layers up to 2 days in advance, wrap tightly in plastic wrap, and store refrigerated. Bring to room temperature before frosting for best results.
- Common pitfall: Avoid opening the oven door frequently during baking, which can cause the layers to deflate.
- Food coloring tip: Use gel-based coloring for a more intense red with less liquid added to your batter.
Serving Suggestions
Slice and serve at room temperature alongside a cup of freshly brewed coffee or a light, fruity tea. For added decadence, plate with a drizzle of homemade raspberry sauce or fresh berries. This classic cake also shines when paired with a light dusting of powdered sugar or garnished with a sprig of fresh mint for subtle color contrast.

| Nutrient | Amount per Serving |
|---|---|
| Calories | 390 kcal |
| Protein | 4 g |
| Carbohydrates | 50 g |
| Fat | 18 g |
For further inspiration on classic dessert recipes, check out our Classic Chocolate Cake Recipe and learn more about baking essentials at King Arthur Baking’s Red Velvet Guide.
Q&A
Q&A: The Ultimate Red Velvet Cake Recipe – Classic & Irresistible
Q1: What makes red velvet cake so uniquely red?
A1: The signature red hue of a classic red velvet cake comes from a combination of natural cocoa powder and a touch of acidic ingredients like buttermilk or vinegar, which react to bring out that vibrant color. Traditionally, red food coloring is added for that striking, eye-catching shade that we all love.
Q2: Can I use regular cocoa powder or does it have to be Dutch-processed?
A2: While Dutch-processed cocoa is smoother and less acidic, classic red velvet recipes often call for natural cocoa powder becuase its acidity interacts with the buttermilk and vinegar to deepen the red color and tenderize the crumb. Using natural cocoa powder gives you that true red velvet charm.
Q3: What is the secret to achieving the cake’s signature moist and velvety texture?
A3: The magic lies in the balance of ingredients-acidic buttermilk and vinegar tenderize the gluten in the flour, while oil (rather of butter) helps keep the crumb moist. mixing the batter gently to avoid overworking the flour also preserves that tender, melt-in-your-mouth feel.
Q4: can I substitute buttermilk if I don’t have any on hand?
A4: Absolutely! You can make a simple buttermilk substitute by adding a tablespoon of lemon juice or white vinegar to a cup of milk, then letting it sit for 5-10 minutes until it thickens and curdles slightly. This homemade version works beautifully in place of store-bought buttermilk.
Q5: What frosting pairs best with red velvet cake?
A5: Classic cream cheese frosting is the reigning champion when it comes to red velvet cake. Its tangy richness complements the subtle cocoa flavor perfectly, creating a luscious contrast. You can also experiment with mascarpone or silky whipped cream cheese blends for a creative twist.
Q6: how can I ensure my red velvet cake layers come out even and bake perfectly?
A6: Start by measuring your batter precisely, dividing it evenly between pans. Use cake strips or wrap damp cloths around the pans to help them bake evenly without doming. Keep an eye on the baking time, and always test with a toothpick-when it comes out clean or with just a few crumbs, you’re golden.
Q7: Is it possible to make this recipe gluten-free without sacrificing taste and texture?
A7: Yes! Using a gluten-free all-purpose flour blend designed for baking can yield flavorful results. Because red velvet is tender by nature,it adapts well to gluten-free flours,though adding a small amount of xanthan gum might help give it that classic structure and softness.
Q8: How far in advance can I bake the cake layers and frost them?
A8: You can bake the cake layers up to two days ahead and store them tightly wrapped at room temperature or refrigerated to keep them fresh. Frosting is best applied the day you serve the cake, but if needed, assembled cakes can be refrigerated overnight-just bring them to room temperature before serving for the best texture and flavor.
Q9: Can this red velvet recipe be turned into cupcakes?
A9: Definitely! The batter is perfect for cupcakes. Bake them at 350°F (175°C) for about 18-22 minutes, or until a toothpick inserted in the center comes out clean. Top with a generous swirl of cream cheese frosting for individual-sized indulgence.
Q10: What’s one extra tip for making this red velvet cake truly irresistible?
A10: Use high-quality ingredients – fresh buttermilk, pure vanilla extract, and real cream cheese will elevate your cake from simply good to unforgettable. Don’t rush the process; gentle mixing and proper oven temperature will reward you with tender, melt-in-your-mouth slices that everyone will swoon over.
In Retrospect
And there you have it-the ultimate red velvet cake recipe that promises classic flavor with an irresistibly moist texture in every bite.Whether you’re baking for a special occasion or simply indulging a sweet craving, this timeless dessert effortlessly combines rich cocoa, tangy buttermilk, and that signature velvety crumb. So preheat your oven, gather your ingredients, and let this iconic cake become a cherished staple in your kitchen repertoire. Because when it comes to red velvet, the only thing better than baking it is sharing it-one luscious slice at a time.