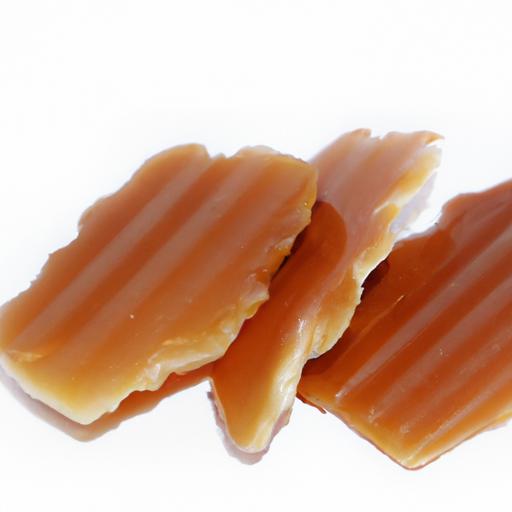

There’s something enchanting about teh sweet, amber glow of maple candy-a timeless treat that carries the essence of rustic forests and early frost-kissed mornings. Rooted in centuries-old traditions, homemade maple candy isn’t just a confection; its a party of nature’s artistry and the patience of the hands that craft it. Whether you’re a seasoned sugarhouse visitor or a curious kitchen adventurer, creating this delightful treat at home offers both a taste of history and a moment of pure, syrupy joy. join us as we unravel the sweet tradition of making homemade maple candy, guiding you through each step to transform liquid gold into melt-in-your-mouth magic.
Sweet Tradition: How to Make Homemade Maple Candy delight begins with choosing the right maple syrup-a crucial step that defines the authentic flavor and depth of your final delicacy. Opt for a Grade A Dark Amber or Grade B maple syrup, which boasts a richer, more robust taste ideal for candy making. Lighter syrups can yield a subtler sweetness, but if you desire that signature warm maple essence, the darker varieties are your best friend.
Choosing the Perfect Maple Syrup for Authentic flavor
When selecting syrup, prioritize 100% pure maple without additives. Avoid commercial blends or pancake syrups, as these can introduce unwanted flavors and alter the texture during boiling. The purity of the syrup ensures your Sweet Tradition: How to Make Homemade Maple Candy Delight captures the essence of true maple craftsmanship, reminiscent of cozy maple sugaring seasons in northern forests.
Mastering the Boiling process to Achieve Ideal Candy Texture
The boiling stage demands attention and precision. Pour your chosen maple syrup into a heavy-bottomed saucepan to ensure even heat distribution. Using a reliable candy thermometer, heat the syrup to exactly 235°F-240°F (soft-ball stage). This range is vital for achieving that perfect chewy but slightly firm texture that defines maple candy.
Stir sparingly during boiling, as vigorous stirring can introduce air bubbles leading to a grainy texture. Once you reach the target temperature,remove the pan promptly from heat to prevent overcooking,which can harden the candy or cause burning notes-undermining your Sweet Tradition endeavor.
Creative Tips for Shaping and Decorating Your Maple Treats
Once the syrup cools slightly but remains pliable, transfer it to a buttered marble slab or a silicone mat for shaping. Use a lightly greased scraper and knife to cut candies into classic rectangles or fun shapes. For a creative twist, mold small maple candy spheres using silicone molds, or roll strips around cinnamon sticks for a fragrant surprise.
Decorate with toasted pecans, finely chopped crystallized ginger, or a sprinkle of sea salt flakes for visual contrast and flavor complexity. Wrap each piece in delicate wax paper squares to keep freshness intact and create an inviting presentation.
Storing and Serving Suggestions to Enhance Freshness and Enjoyment
Store maple candies in an airtight container, separated by parchment or wax paper, at a cool, dark place to prevent melting or sticky clumping. Properly stored, your candies will maintain their pristine texture for up to two weeks.
For serving, arrange them on a rustic wooden board alongside fresh apples, sharp cheddar cheese, or a spread of nut butters to complement the maple’s sweetness. Pair your candies with a warm cup of spiced tea or rich coffee to elevate the tasting experience-each bite a celebration of the sweet tradition passed down through generations.
Prep and Cook Time
- Prep Time: 10 minutes
- Cook Time: 20-25 minutes
- Cooling/Setting Time: 30 minutes
Yield
Approximately 40 1-inch maple candies
Difficulty Level
Medium – requires attentive boiling and careful handling
Ingredients
- 2 cups pure Grade A Dark Amber or Grade B maple syrup
- Butter or neutral oil, for greasing
- Optional garnishes: toasted pecans, crystallized ginger, sea salt flakes
Instructions
- Prepare your workspace: Lightly grease a marble slab, silicone mat, or baking sheet. Have a candy thermometer ready.
- Heat the syrup: Pour maple syrup into a heavy-bottomed saucepan. Slowly bring to a boil over medium heat, stirring occasionally.
- monitor temperature: Attach the candy thermometer and continue boiling without stirring vigorously,until the syrup reaches 235°F-240°F (soft-ball stage).
- Remove from heat: Instantly take the saucepan off the burner to prevent overcooking.
- Cool slightly: Let the syrup rest for 2-3 minutes until it thickens but is still pliable.
- Shape the candy: Pour onto the prepared slab or mat. Grease your scraper and cut into desired shapes or roll into balls.
- Add garnishes: While still warm, sprinkle toasted pecans, ginger, or sea salt on top as desired.
- Cool entirely: Allow candies to set fully at room temperature for 30 minutes.
- Wrap and store: Individually wrap candies in wax paper for freshness.
Chef’s Notes
- For a smoother texture, you can briefly stir the syrup after reaching the soft-ball stage to encourage grain formation but avoid over-stirring.
- Experiment with natural extracts like vanilla or almond (1/4 tsp) for subtle flavor variations.
- If your syrup crystals too quickly or becomes too hard, reduce boil temperature slightly next time.
- Mapping your candy on a cool marble surface speeds the setting process and prevents sticking.
Serving Suggestions
present your maple candies on a vintage wooden tray or glass platter to showcase their warm amber glow. Add fresh seasonal fruits such as apple slices, or pair with crumbly sharp cheddar as a delightful contrast. Hot herbal teas like chamomile or robust black tea complement the maple’s sweetness,making servings feel luxurious yet cozy. For parties, include small decorative tags tied with twine, telling the story behind your Sweet Tradition creation.
| Nutrition (per candy) | Amount |
|---|---|
| Calories | 55 |
| Protein | 0g |
| Carbohydrates | 14g |
| Fat | 0g |
explore more about crafting homemade maple syrup for an authentic foundation. For ancient context and maple syrup grades, visit the U.S. Maple Producers Association.

Q&A
Q&A: sweet tradition – How to Make Homemade Maple Candy Delight
Q1: What is maple candy, and why is it considered a sweet tradition?
A1: Maple candy is a classic treat crafted from pure maple syrup, boiled down and cooled into a smooth, melt-in-your-mouth delight. Celebrated especially in regions where maple trees thrive, it’s a sweet tradition that honors the natural bounty of the forest and the artistry of early maple syrup harvesters. Making maple candy at home connects you to a centuries-old ritual of turning sap into simple, exquisite sweetness.
Q2: What type of maple syrup shoudl I use to make the best homemade maple candy?
A2: for the richest flavor and ideal texture, use 100% pure maple syrup, preferably Grade A amber or darker. Lighter syrups tend to be more delicate, while darker ones bring a robust, caramelized depth to your candy. Avoid pancake syrups with additives; pure maple syrup is the essence of authenticity in this recipe.
Q3: What’s the basic process for turning maple syrup into candy?
A3: The process is delightfully straightforward yet requires careful attention. You gently boil the maple syrup to a precise temperature-usually around 235°F to 240°F (soft ball stage)-then cool it slightly. After cooling,you stir the syrup vigorously or pour it into molds,which transforms the liquid into a creamy,firm candy that holds the unmistakable taste of pure maple.
Q4: Are there any special tools or equipment needed to make maple candy?
A4: The essentials include a heavy-bottomed saucepan, a candy thermometer to monitor precise temperatures, a wooden spoon for stirring, and a heat-safe mold or parchment paper for setting the candy.patience and good timing are your best tools-watching syrup change from liquid gold to candy treasure is part of the magic.
Q5: Can I add flavors or mix-ins to my maple candy?
A5: Absolutely! While pure maple candy is wonderfully rich on its own, creative touches like a pinch of sea salt, vanilla extract, or finely chopped nuts can elevate your creation. Just add these near the end of the boiling or stirring process to blend flavors seamlessly without overpowering the maple’s natural charm.
Q6: How do I know when the maple syrup has reached the perfect temperature for candy-making?
A6: Using a reliable candy thermometer is key. When the syrup hits the soft ball stage (about 235°F to 240°F), a small drop of boiled syrup dropped into cold water will form a soft, flexible ball that squishes between your fingers. This signals it’s ready to cool and be shaped into candy.
Q7: What’s the best way to store homemade maple candy?
A7: Maple candy keeps best in an airtight container at room temperature, away from direct sunlight and heat. Stored properly, it can stay fresh and chewy for several weeks, allowing you to savor a taste of maple magic long after you’ve made it.
Q8: Is making maple candy a good activity for families or beginners?
A8: Absolutely! Making maple candy is a fun and educational experience for all ages. Just be cautious around hot syrup, as it can cause burns. With adult supervision and clear guidance, kids can enjoy stirring and shaping the candy, turning the kitchen into a sweet workshop of tradition and creativity.
Q9: Can maple candy be gifted, and how should it be packaged?
A9: Homemade maple candy makes a thoughtful, heartwarming gift. Wrap pieces individually in wax paper or cellophane to keep them fresh and prevent sticking. Place the wrapped candies in a decorative box or tin for a personal touch that shares the sweet heritage of maple syrup with friends and family.
Q10: How does homemade maple candy differ from store-bought versions?
A10: Homemade maple candy carries the unmistakable freshness and purity of real maple syrup, made with care and personal flair. Unlike many store-bought candies, which may include additives or artificial flavors, homemade versions highlight the syrup’s natural complexities and allow you to customize texture and taste. The pride of crafting your own sweet tradition can’t be bought-it’s made, spoonful by spoonful.
Final Thoughts
As the last piece of your homemade maple candy melts on your tongue, you’re not just savoring a sweet treat-you’re tasting a tradition steeped in history, patience, and the simple joy of nature’s gifts. Crafting maple candy at home connects you to a timeless ritual, transforming pure sap into golden delight with your own hands. Whether shared with loved ones or enjoyed in a quite moment, this sweet tradition reminds us that sometimes, the most meaningful pleasures come from the simplest ingredients and the care we pour into them. So next time the maple season calls, embrace the process, experiment with your own twists, and let each tender bite be a celebration of heritage and homemade happiness.