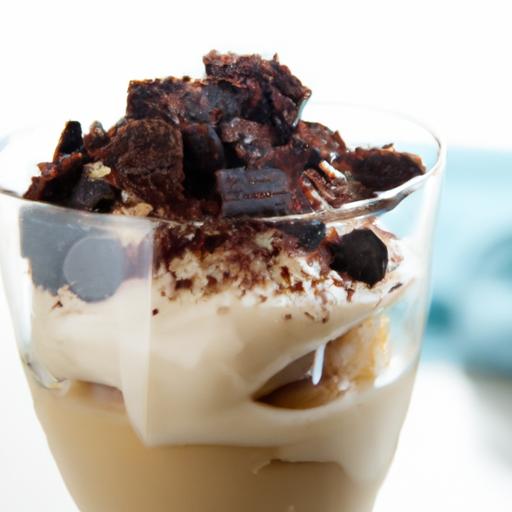
There’s something irresistibly nostalgic about digging your spoon into a sweet, creamy cup of dirt pudding-a delightful concoction that brings childhood memories to life with every bite. Combining the rich chocolatey flavor of pudding, the crunchy surprise of crushed cookies, and the playful touch of gummy worms, classic dirt pudding cups are more than just a dessert-they’re a whimsical experience. In this article, we’ll uncover the simple yet magical steps to create your very own dirt pudding cups, transforming everyday ingredients into an enchanting treat that’s perfect for parties, family gatherings, or a fun twist on your dessert routine. Get ready to roll up your sleeves and dig into delight!
Dig Into Delight: How to Make Classic Dirt Pudding Cups starts with the art of selecting the freshest, richest ingredients to create this nostalgic treat that delights both kids and adults alike. This playful dessert combines creamy pudding, crunchy cookie crumbs, and fun toppings to mimic a little garden in a cup-every bite a perfect balance of texture and flavor. Whether it’s a family gathering or a fun kids’ party, mastering the right ingredients and layering technique will elevate your Dirt Pudding Cups from simple to sensational.
Prep and Cook Time
- readiness: 15 minutes
- Chilling: 1 hour
- total Time: 1 hour 15 minutes
Yield
Serves 6 delightful Dirt Pudding Cups
Difficulty Level
Easy – Perfect for beginner and seasoned home bakers alike
Choosing the Perfect Ingredients for Irresistible Dirt Pudding Cups
Start with a high-quality instant chocolate pudding mix for that rich, creamy base that forms the foundation of tasty Dirt Pudding Cups. Whole milk rather than skim enhances the pudding’s silky texture and indulgence. For the “dirt,” opt for crushed chocolate sandwich cookies with a hint of cocoa – classic Oreos or any similar brand with a dark chocolate flavor and minimal sweetness complement the pudding perfectly. To bring organic freshness, top with gummy worms and crushed chocolate chips, elevating the nostalgic charm. A sprinkle of chopped nuts, shredded coconut, or even edible flowers can add an unexpected twist and a sophisticated flair.
Mastering the Layering Technique to Create Eye-Catching Dessert Cups
Achieving that signature dirt-and-worms look requires more than just mixing ingredients. Begin by carefully spooning a generous layer of pudding into your chosen clear dessert cups-glass or plastic works well to showcase the layers. Next, sprinkle a lavish layer of cookie crumbs to mimic rich garden soil. Repeat the pudding and cookie crumb layers at least twice for visual depth and textural contrast.
For a whimsical surprise inside, nestle gummy worms between layers so they peek out invitingly. Use a small spoon or piping bag to keep layers neat and distinct.This attention to layering not only makes your dirt pudding visually stunning but ensures every bite blends creamy, crunchy, and chewy textures harmoniously.
Creative Twists and Toppings to Elevate Your Classic Dirt Pudding
- fruit Infusion: Add diced ripe strawberries or raspberries between layers for bursts of tangy fresh flavor.
- Nutty crunch: Toasted pecans or almonds finely chopped bring an irresistible crunch and depth.
- Peanut Butter Swirl: Gently fold smooth peanut butter into the pudding before layering for a luscious nutty aroma.
- Caramel Drizzle: Finish with a delicate drizzle of warm caramel sauce that pairs beautifully with chocolate.
- Marshmallow Puff: Top with mini marshmallows and toast them lightly under the broiler for a campfire twist.
These creative twists turn the classic dirt pudding into a customizable dessert that excites every palate, showcasing not just flavor but also artistry in a glass.
Tips for Serving and Storing Dirt Pudding Cups to Maintain Freshness
Serve Dirt Pudding Cups chilled straight from the fridge, ideally after letting them set for at least 1 hour. Keep them covered with plastic wrap or airtight lids during refrigeration to prevent the cookie crumbs from absorbing moisture and becoming soggy. For best texture, add any fresh fruit or marshmallow toppings just before serving. This ensures that your dessert retains its signature crunch and fresh appeal.
If making ahead, assemble the pudding and cookie layers but reserve toppings until serving day. Stored properly, these cups will stay deliciously fresh for up to 2 days. For outdoor events, pack toppings separately and add on-site to keep your dessert pristine and irresistible.
Ingredients
- 1 package (3.9 oz) instant chocolate pudding mix
- 2 cups whole milk, cold
- 15 chocolate sandwich cookies (such as Oreos), crushed finely
- 12 gummy worms, halved
- 1/4 cup mini chocolate chips (optional)
- Fresh mint leaves (for garnish, optional)
Instructions
- Prepare the pudding: In a medium bowl, whisk the instant chocolate pudding mix with cold whole milk for about 2 minutes until thickened. Set aside to firm up.
- Crush the cookies: Using a food processor, pulse sandwich cookies until you have a sandy, crumb-like consistency. Avoid pulverizing into powder to retain some texture.
- Layer the base: Spoon ¼ cup of pudding into each cup to create the first layer.
- Add “dirt” layer: Sprinkle about 2 tablespoons of crushed cookies on top of the pudding layer evenly, mimicking soil.
- Insert gummy worms: nestle 2-3 gummy worm halves into the cookie crumbs to peek out playfully.
- Repeat layering: Add another pudding layer (¼ cup), followed by more cookie crumbs, until cups are nearly full, finishing with a dirt layer.
- Top with chips and garnish: Sprinkle mini chocolate chips and fresh mint leaves on top for extra flavor and visual appeal.
- Chill: Refrigerate the dirt Pudding Cups for at least 1 hour to set and meld flavors.
- Serve cold: Serve chilled for the best texture contrast and taste.
chef’s Notes
- For an even creamier texture, substitute half of the milk with heavy cream.
- Crush cookies just before assembling to maintain a crispy topping.
- Try using gluten-free cookies to accommodate dietary restrictions without sacrificing taste.
- Make ahead by prepping pudding and cookie crumbs separately; layer and garnish just before serving.
- Experiment with flavored pudding mixes like vanilla or butterscotch for a unique twist on this classic.
- Use clear cups to show off your creative layers and colors-presentation is key to delighting guests.
Serving Suggestions
Display Dirt Pudding Cups on a rustic wooden tray with small dessert spoons. For parties, decorate cups with playful flags or tiny garden tools for a whimsical touch.Garnish with edible flowers or a dusting of powdered sugar to mimic morning dew on “soil.” Pair these cups with sparkling lemonade or creamy milkshakes for an irresistibly nostalgic dessert experience.
| Nutrient | Per Serving |
|---|---|
| Calories | 280 kcal |
| Protein | 5 g |
| Carbohydrates | 38 g |
| Fat | 10 g |
Explore more chocolate dessert recipes here for inspired variations on this classic. For food safety best practices when preparing pudding desserts, visit the FoodSafety.gov official site.

Q&A
Q&A: Dig Into Delight – How to Make Classic Dirt Pudding Cups
Q1: What exactly are dirt pudding Cups?
A1: Dirt Pudding Cups are a whimsical, no-bake dessert that combines creamy chocolate pudding, crushed cookies, and gummy worms to create a fun, edible “dirt” scene. They’re perfect for parties or anytime you want a playful treat that delights both kids and adults alike!
Q2: what are the essential ingredients for classic Dirt Pudding Cups?
A2: The classics call for just a handful of simple ingredients: instant chocolate pudding mix, cold milk, crushed chocolate sandwich cookies (think Oreo-style), and gummy worms. Some recipes also add whipped topping for extra fluffiness and a creamy texture.
Q3: Why are crushed cookies used instead of just plain chocolate pudding?
A3: The crushed cookies mimic the look and texture of real dirt, adding a satisfying crunch that contrasts beautifully with the smooth pudding. This combination makes the dessert visually striking and texturally interesting-just like digging in your backyard, but tastier!
Q4: can I customize Dirt Pudding Cups for different occasions?
A4: Absolutely! While classic versions feature gummy worms, feel free to swap in candy spiders for Halloween, colorful sprinkles for birthdays, or fresh berries for a garden-themed twist. The beauty of Dirt Pudding Cups is their versatility and creativity.
Q5: How long do dirt Pudding Cups need to chill before serving?
A5: After assembling, chill the cups in the refrigerator for at least 1-2 hours. This resting time lets the pudding set firmly and allows the flavors to meld, making every bite delightfully creamy and cohesive.
Q6: are there any tips for perfectly crushing the cookies?
A6: Yes! To get an even “soil” texture, place the cookies in a sealed plastic bag and gently crush them with a rolling pin or the bottom of a glass. Aim for a mixture of fine crumbs and small chunks to replicate the natural variation of dirt.
Q7: Can Dirt Pudding Cups be made ahead of time?
A7: Definitely! In fact, they’re a perfect make-ahead dessert. Assemble everything and refrigerate overnight if you like-just add the gummy worms right before serving to keep them looking fresh and fun.Q8: What’s a fun way to serve Dirt Pudding Cups?
A8: Serve them in small clear cups or mason jars to showcase the layers of creamy pudding and crumbly “dirt.” Add a tiny shovel-shaped spoon or a themed decoration on top to enhance the playful digging experience.
Q9: Is there a way to make Dirt Pudding Cups gluten-free?
A9: You can substitute the crushed sandwich cookies with gluten-free chocolate cookies or gluten-free chocolate graham crackers. Just make sure the pudding mix you choose is gluten-free, too, and you’ll have a delicious, safe treat for everyone.
Q10: What makes Dirt Pudding Cups such a beloved dessert?
A10: Their magic lies in the combination of nostalgia, texture, and creativity. They invoke childhood memories of playing in the dirt, indulging in chocolate, and having a little messy fun-without any mess! Plus, the ease of preparation makes them a go-to favorite for all skill levels in the kitchen.
To Wrap It up
As you pull your spoon through the layers of creamy chocolate pudding, crunchy Oreos, and gooey gummy worms, you’ll realize that making classic dirt pudding cups is more than just a recipe-it’s a delightful adventure in every bite. Whether you’re crafting these playful treats for a family gathering or a whimsical dessert centerpiece, the charm lies in their simplicity and nostalgic appeal. So go ahead, dig in, and let each spoonful bring a little childhood magic to your day. Happy indulging!