

There’s something undeniably magical about the humble dirt pudding cup-a charming blend of creamy sweetness and playful surprise that delights kids and adults alike. More than just a whimsical dessert, dirt pudding cups offer a nostalgic journey back to childhood picnics, backyard adventures, and simple joys. But what exactly makes this treat so irresistibly fun and delicious? In this article,we’ll dig beneath the surface to uncover the ingredients,history,and clever tricks that bring dirt pudding cups to life,revealing why this playful dessert continues to capture hearts (and taste buds) everywhere.
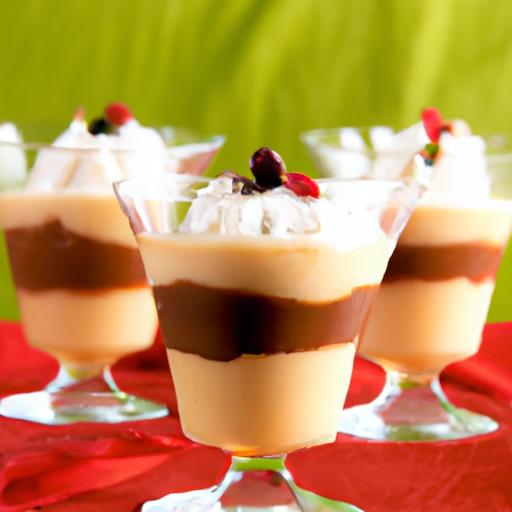
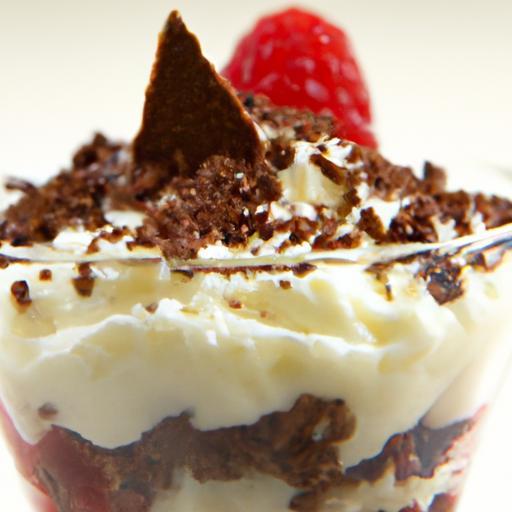
Dig Into Dirt Pudding Cups and uncover the playful magic behind this delightfully nostalgic dessert. Originally inspired by childhood fun and garden-themed parties, dirt pudding cups bring together an irresistible blend of creamy, crunchy, and chocolaty textures that captivate both kids and adults alike. Their whimsical appearance – rich chocolate “soil” layered with smooth pudding and “earthworm” gummy candies – makes every spoonful an adventure worth savoring.
Prep and Cook Time
- Preparation: 15 minutes
- Chill Time: 2 hours
- Total Time: 2 hours 15 minutes
Yield
Serves 6 delightful dirt pudding cups
Difficulty Level
Easy – Perfect for beginners and seasoned dessert makers alike
Ingredients
- 1 package (3.9 oz) instant chocolate pudding mix
- 2 cups cold whole milk
- 1 cup heavy cream, whipped to stiff peaks
- 1 package (14 oz) Oreo cookies, crushed finely to resemble “dirt”
- 1 cup gummy worms (optional but highly encouraged!)
- Fresh mint leaves for garnish (optional)
- Miniature garden-themed candy like edible flowers or candy butterflies (optional)
Instructions
- Prepare the pudding: In a mixing bowl, whisk the instant chocolate pudding mix together with the cold milk until combined and slightly thickened, about 2 minutes. Refrigerate for 5 minutes to set.
- Crush the Oreo cookies: Place the cookies in a sealed plastic bag and crush them into fine crumbs using a rolling pin, mimicking nutrient-rich garden soil. Reserve a handful for topping.
- Fold in whipped cream: Gently fold the whipped cream into the set pudding mixture until smooth and airy. This creates a luxurious, mousse-like texture that is key to an indulgent dirt pudding cup.
- Layer the dessert: In each serving cup, spoon a layer of crushed cookie “soil,” followed by a generous layer of creamy pudding mixture. Repeat to fill the cup, finishing with a thick topping of crushed Oreos.
- Add decorative fun elements: Nestle a few gummy worms on top or partially bury them in the “soil” to achieve that iconic garden look.
- Chill: Refrigerate the completed dirt pudding cups for at least 2 hours. This step melds the flavors and improves texture consistency.
- Serve: Right before serving, garnish with fresh mint leaves or miniature edible garden candies for an enchanting presentation.
Chef’s Notes: tips for Success
- Texture matters: Crushing Oreos finely will simulate the perfect “dirt” texture. Leave some cookie chunks for added crunch if desired.
- Make it your own: Swap chocolate pudding for vanilla or butterscotch to create new flavor profiles.
- Vegan version: Use plant-based milk and whipped cream alternatives along with dairy-free pudding mix.
- Prep ahead: Dirt pudding cups keep well chilled for up to 48 hours; add gummy worms fresh before serving to prevent stickiness.
- Worm placement idea: Insert gummy worms on skewers when chilling for dramatic removal and presentation at the table.
Serving Suggestions
Serve these whimsical treats in clear glass cups or mini mason jars to showcase the layers beautifully. Accompany with a small wooden “garden shovel” spoon for fun, playful eating. For parties, line a tray with mini flowerpots or scatter chocolate “rocks” (chocolate-covered almonds) nearby to enhance the garden vibe.A dusting of edible glitter over the top can add a magical sparkle perfect for celebrations.
| Nutrient | Per Serving |
|---|---|
| Calories | 280 |
| Protein | 5g |
| Carbohydrates | 36g |
| Fat | 14g |

For more creative dessert ideas, check out our fun no-bake dessert recipes. When looking for inspiration on pudding variations, Food Network’s Pudding Recipes offer fantastic guidance.
Q&A
Q&A: Dig Into Dirt Pudding Cups – A Fun, Tasty Treat Explained
Q1: What exactly are Dirt Pudding Cups?
A1: dirt Pudding Cups are a playful dessert that looks like a miniature garden patch but tastes like sweet, creamy heaven! They’re made by layering chocolate pudding with crushed cookies (usually Oreos) to mimic soil, and often topped with gummy worms or candy “bugs” for that extra fun factor. Think of it as edible dirt that’s deliciously irresistible.
Q2: Why are they called “Dirt” Pudding Cups?
A2: The name comes from their mud-like appearance-chocolate pudding resembles moist soil and the crushed cookies look like dirt clods. When you toss in gummy worms wriggling around, it’s like you’re actually digging into a tiny garden bed. It’s all about turning dessert into a playful, sensory experience!
Q3: How do you make dirt Pudding Cups at home?
A3: It’s surprisingly simple! Start with a base of creamy chocolate pudding, layer on a generous amount of crushed chocolate sandwich cookies, then add more pudding and cookie crumbs for depth. garnish with gummy worms,candy bugs,or even edible flowers to create your own edible dirt patch.Chill before serving for best texture.
Q4: Are Dirt Pudding Cups kid-friendly?
A4: Absolutely! Kids love the novelty of “eating dirt” without any actual mess or messiness. Plus, the layers make it a fun activity to assemble, and the gummy worms add a playful surprise. They’re a fantastic treat for birthday parties, school events, or just a creative afternoon snack.
Q5: Can Dirt Pudding Cups be customized for different tastes?
A5: Definitely! While classic versions stick to chocolate pudding and Oreos,you can switch up flavors-try vanilla or butterscotch pudding,crushed graham crackers or chocolate chips,and even fresh berries on top. You can also play with the “bugs” by using fruit snacks or nuts, tailoring it to dietary preferences and flavor cravings.
Q6: What’s the history behind Dirt Pudding Cups?
A6: Dirt cups-or muddy buddies, as some call them-have roots in American home cooking as a fun, no-bake dessert. They gained popularity as a quirky treat for kids because they merge imagination with taste. Over time, they evolved with creative twists, becoming a staple at parties and family gatherings.
Q7: Any tips for making Dirt Pudding Cups extra delicious?
A7: For a rich texture, use homemade pudding or a high-quality store-bought mix. Freeze the gummy worms beforehand for a cool surprise, and add a dollop of whipped cream on top for creaminess and flair. Also, serve them in clear cups to showcase the layers-it makes the “dirt” effect pop visually!
Q8: Where can I buy ready-made Dirt Pudding Cups?
A8: while you can find some specialty bakeries or grocery sections offering pre-assembled dirt cups, part of the charm is making them yourself. Many online retailers sell kits with pudding mix, cookies, and gummy worms for an easy DIY experience if you’re short on time.
Dig into a Dirt Pudding Cup and rediscover the joy of childhood wonder, blending creativity with sweet indulgence in every tasty scoop!
Key Takeaways
Whether you’re a kid craving a playful snack or an adult looking to relive a bit of childhood magic, dirt pudding cups offer a delightful blend of textures and flavors that never fail to impress. From their creamy, chocolatey base to the crunchy “soil” topping and those whimsical gummy worms, these cups are more than just a treat-they’re an experience. Now that you know the secrets behind this fun dessert, why not roll up your sleeves and create your own edible garden? After all, sometimes the best adventures begin with digging into a simple cup of dirt.