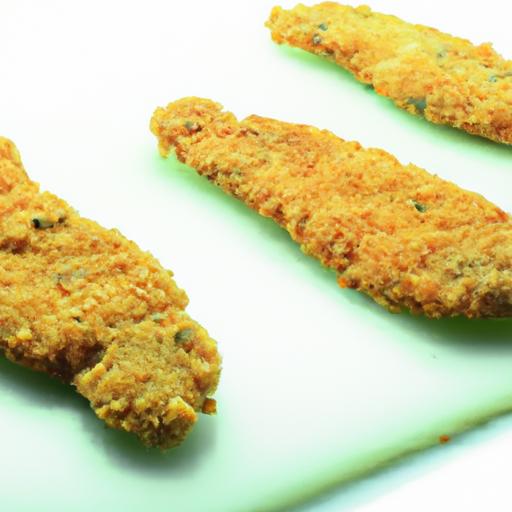

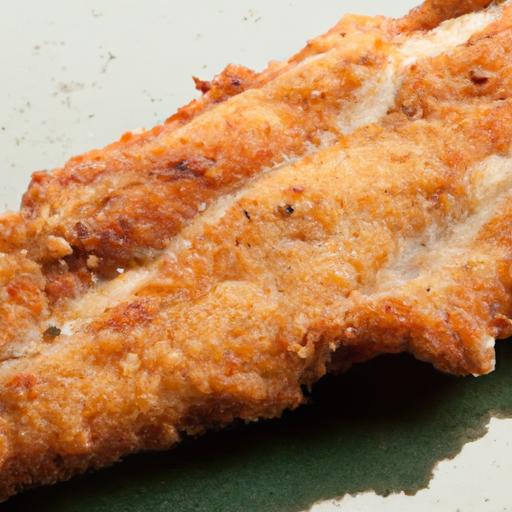
There’s something undeniably satisfying about the perfect Chicken Milanese: golden, crispy, adn bursting with flavor, yet surprisingly simple to make. Whether you’re a kitchen novice or a seasoned home cook looking to impress without hours of fuss, this classic Italian-inspired dish is your ticket to a delicious dinner that’s both quick and rewarding. In this ultimate guide, we’ll break down the secrets to achieving that irresistible crunch, share easy-to-follow steps, and offer tips to elevate your Chicken milanese from everyday meal to memorable feast. Get ready to transform a humble chicken breast into a culinary masterpiece that’s crispy, simple, and utterly irresistible.
Mastering the Perfect Crispy Coating for Irresistible Crunch
Crispy & Simple chicken milanese begins with a sublime coating that delivers that coveted golden crunch while sealing in tender juiciness. The secret lies not just in the ingredients, but in the technique-ensuring your breading is crisp yet delicate, never greasy or heavy. Using a combination of panko breadcrumbs for airy crunch and a touch of finely grated Parmesan adds a savory depth that dances on the palate. For the best texture, dry the chicken thoroughly before dredging, and maintain even, gentle frying temperatures to achieve that perfect crunch without burning.
Choosing the Best Chicken Cuts for Tender Juicy Results
Opt for boneless, skinless chicken breasts that are evenly sized and about ½ inch thick, or butterfly the breasts if larger, to achieve uniform cooking. Thin cuts cook quickly and absorb the coating beautifully without drying out. For even juicier results, pound the chicken lightly between two sheets of parchment to an even thickness-this creates an ideal canvas for the crispy coating and guarantees a succulent bite every time.
Step by Step to Flawless Milanese Every Time
Prep and Cook Time: Approximately 30 minutes total
Yield: 4 servings
Difficulty Level: Easy to Medium – perfect for confident beginners or anyone wanting a fuss-free dinner with knockout flavor.
Ingredients
- 4 boneless,skinless chicken breasts (about 6 oz each)
- 1 cup all-purpose flour,sifted
- 2 large eggs,beaten
- 1 ½ cups panko breadcrumbs
- ½ cup finely grated Parmesan cheese
- 1 teaspoon garlic powder
- 1 teaspoon dried oregano
- Salt and freshly ground black pepper,to taste
- Vegetable oil for frying (about ½ inch depth)
- Fresh lemon wedges,for serving
- Fresh flat-leaf parsley,finely chopped,for garnish
Instructions
- Prepare the chicken: Pat each breast dry with paper towels. If thicker than ½ inch, butterfly or gently pound between parchment paper to even thickness. Season both sides evenly with salt, pepper, garlic powder, and oregano.
- Set up your breading station: Place flour in one shallow dish, beaten eggs in another, and combine panko breadcrumbs with grated Parmesan in the third.Mix thoroughly for an even coating.
- Dredge the chicken: coat each piece first in flour, shaking off excess, then dip into the beaten eggs, allowing excess to drip off. press the chicken firmly into the breadcrumb mixture, ensuring full coverage. For extra crunch, double-dip in egg and breadcrumbs if desired.
- Heat the oil: Pour vegetable oil into a large skillet to a depth of about ½ inch. Heat over medium heat until shimmering but not smoking (approximately 350°F or a small breadcrumb sizzles immediately).
- Fry the chicken: Place chicken pieces carefully into the hot oil. Cook in batches, avoiding overcrowding, until golden brown and crisp on one side-about 3-4 minutes. Flip and cook the other side for another 3-4 minutes. Internal temperature should reach 165°F.
- Drain and rest: Transfer to a wire rack set over a baking sheet or paper towels to drain excess oil. Let rest for 3 minutes before serving to maintain crispness and allow juices to redistribute.
Chef’s Notes & tips for success
- Breadcrumb Variety: Panko is our go-to for crunch. For slight variation, mix half italian seasoned breadcrumbs for added herbs without overpowering flavors.
- oil Temperature: Use a thermometer to avoid low temperatures (greasy coating) or overheating (burnt breadcrumbs). Moderate consistent heat is key.
- Make Ahead: Bread the chicken and refrigerate up to 2 hours before cooking. This helps the coating adhere better.
- Oven Finish Option: For a lighter touch,after frying just 2 minutes per side,finish cooking in a preheated 375°F oven for 8-10 minutes.
- gluten-Free Alternative: Substitute panko with crushed cornflakes or gluten-free breadcrumbs and use rice flour for dredging.
Serving Suggestions to Elevate Your Chicken Milanese experience
Serve your crispy chicken Milanese proudly on a large platter garnished with fresh lemon wedges-the citrus cuts through the richness and brightens every bite.A sprinkle of chopped flat-leaf parsley adds visual freshness and a subtle herbaceous note. Pair this with a vibrant side like arugula salad dressed in lemon vinaigrette or crisp roasted baby potatoes. For extra indulgence,a dollop of creamy garlic aioli or a simple caprese salad complements the dish beautifully.
| Nutritional Info (Per Serving) | Amount |
|---|---|
| Calories | 450 kcal |
| Protein | 45 g |
| Carbohydrates | 20 g |
| Fat | 18 g |

Craving more ways to perfect your Crispy & Simple chicken Milanese? Discover our homemade Parmesan breadcrumbs tutorial for even more crunch and flavor at home.For trusted food safety and temperature guidelines, refer to USDA Food Safety Basics.
Q&A
Q&A: Crispy & Simple – your Ultimate Easy Chicken Milanese Guide
Q1: What exactly is Chicken Milanese?
A1: Chicken Milanese is a classic Italian-inspired dish featuring tender chicken breasts that are breaded and pan-fried to golden, crispy perfection. The result is a crunchy exterior with juicy, flavorful meat inside-a simple yet wildly satisfying meal.
Q2: how do I achieve that perfect crispy crust every time?
A2: The secret lies in a well-organized breading station and proper technique: first dredge the chicken in flour, then dip it in beaten eggs, and finally coat it generously with fine breadcrumbs.Use a bit of grated Parmesan for extra flavor and crunch! Fry in hot oil at medium-high heat to seal in moisture and create that irresistible crisp.
Q3: Can I use chicken thighs instead of breasts?
A3: Absolutely! Boneless, skinless chicken thighs work beautifully if you prefer a slightly richer and more tender bite. Just pound them evenly to ensure uniform cooking and crispiness.
Q4: What type of breadcrumbs is best for Chicken Milanese?
A4: Customary Italian-style breadcrumbs or panko both work well. Panko gives a lighter, airier crunch, while Italian-style breadcrumbs add a bit more density and flavor.For a homemade twist, pulse day-old bread in a food processor and toast lightly before using.
Q5: Is it possible to make Chicken Milanese gluten-free?
A5: Yes! Swap regular flour and breadcrumbs for gluten-free flour blends and gluten-free breadcrumbs. almond flour can also be a great option, imparting a nutty flavor and a unique crisp texture.
Q6: What’s the best oil to use for frying Chicken Milanese?
A6: Choose an oil with a high smoke point like vegetable oil, canola oil, or sunflower oil. These oils stay stable at frying temperatures and won’t overpower the delicate flavors of the chicken and breading.
Q7: How do I know when the chicken is cooked through?
A7: Cook each side for about 3-4 minutes until golden brown, and ensure the internal temperature reaches 165°F (74°C).The chicken should be juicy, not dry, so avoid overcooking.
Q8: What are some easy,fresh sides to pair with Chicken milanese?
A8: Crisp green salads with lemon vinaigrette,roasted vegetables,or a simple tomato and basil salad complement the dish perfectly. Mashed potatoes or creamy polenta are also fantastic for a more comforting meal.
Q9: Can Chicken Milanese be made ahead and reheated?
A9: While freshly fried Chicken Milanese is best for the crispiest experience, you can make it ahead and reheat in a hot oven or air fryer to crisp it back up. Avoid microwaving, which tends to soften the crust.
Q10: Any tips for adding a creative twist to Chicken Milanese?
A10: Experiment with adding fresh herbs like rosemary or thyme to your breadcrumbs, or sprinkle lemon zest into the breading for a shining note. Top with simple sauces like arugula and cherry tomato salad or a tangy caper and lemon dressing to elevate the dish effortlessly.Enjoy your crispy, golden, and utterly simple chicken Milanese masterpiece!
In Conclusion
Whether you’re a seasoned home cook or just starting your culinary journey, mastering the art of Chicken Milanese is both rewarding and surprisingly simple. With it’s golden,crispy coating and juicy interior,this timeless dish offers a perfect balance of texture and flavor that never fails to impress. By following these straightforward steps and embracing a few helpful tips, you’ll elevate your weeknight dinners and delight guests alike. So next time hunger strikes, remember: a plate of Chicken Milanese is more than just a meal-it’s a crispy celebration of effortless deliciousness.Happy cooking!