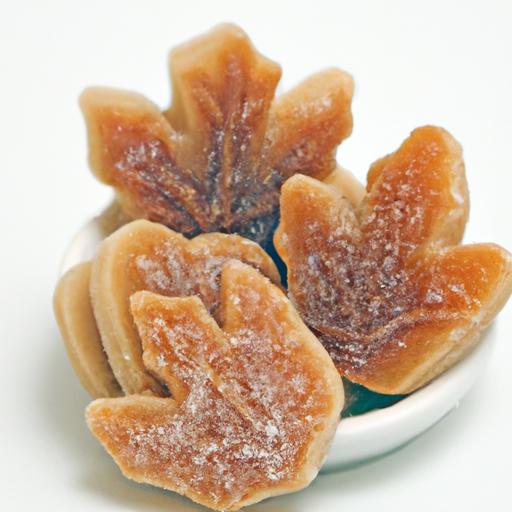
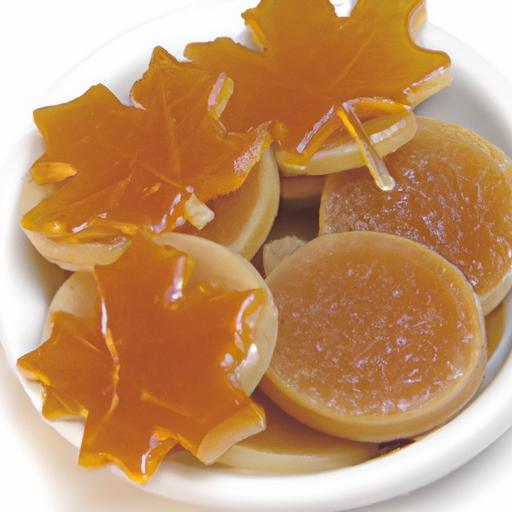
There’s something magically nostalgic about the rich, amber glow of maple candy melting slowly on your tongue-a sweet tradition that warms the heart as much as the taste warms the palate. For generations, families have gathered around bubbling kettles in early spring, transforming the pure, golden sap of maple trees into delightful confections that capture the very essence of the season. In this article, we invite you to embark on a timeless culinary journey to craft classic homemade maple candy.From selecting the perfect sap to mastering the delicate balance of temperature and texture,discover how this beloved treat can be made in your own kitchen,preserving a heritage of sweetness that’s as rich in history as it is in flavor.
Sweet Traditions: Crafting Classic Homemade Maple Candy begins with the perfect choice of maple syrup-the cornerstone that delivers that unmistakable rich, caramelized sweetness. Selecting the right grade of syrup ensures your candy captures the authentic forest-harvested essence that maple lovers crave.
Choosing the Perfect Maple Syrup for Authentic Flavor
To create maple candy that truly honors Sweet Traditions: Crafting Classic Homemade Maple Candy, start by selecting 100% pure maple syrup. Opt for Grade A Dark Amber or Grade A Very Dark syrup, which bring robust, deep flavors that transform into rich, nutty caramel notes once heated. Avoid imitation syrups or those with added sugars, as they lack the natural complexity and texture essential to crafting smooth, melt-in-your-mouth candy. The syrup’s freshness is also crucial-choose a bottle harvested in the current season to capture peak flavor.
Mastering the Candying Process to Achieve the Ideal Texture
The magic of Sweet Traditions: Crafting Classic Homemade maple Candy lies in precise temperature control and timing. Use a heavy-bottomed saucepan to heat the syrup evenly. Bring the syrup to a rolling boil, than reduce heat, carefully monitoring with a candy thermometer until it reaches 234°F to 240°F (112°C to 115°C)-the firm-ball stage. This temperature range ensures the candy sets with the perfect balance: firm enough to hold shape but soft enough to bite into blissful chewiness.Once the syrup hits the mark, transfer it to a cool marble slab or buttered parchment for gentle cooling. Then, begin the pivotal step of vigorous stirring to aerate and soften the mixture, creating that signature creamy texture. Patience here rewards you with a maple candy that melts naturally on the tongue-classic, comforting, and undeniably irresistible.
Creative Variations and Natural Add-Ins to Elevate your Maple Candy
While Sweet Traditions: Crafting Classic Homemade Maple candy honors purity, exciting twists can elevate your batch. Fold in finely chopped toasted pecans or walnuts for a delightful crunch and earthy contrast. A subtle sprinkle of sea salt flakes enhances the candy’s sweetness and layers in complexity. For a hint of warmth, gently incorporate ground cinnamon or nutmeg during the final stirring phase. Another tasty option is adding a few drops of pure vanilla extract just before pouring out the candy to deepen the flavor profile. These natural add-ins honor tradition while inviting a fresh sensory experience, making each bite a delightful adventure.
Tips for Storing and Sharing Your Homemade Sweet Treasures
Once your Sweet Traditions: Crafting Classic Homemade Maple Candy has set, proper storage is key to maintaining its luscious texture and flavor. Wrap each piece individually in wax paper or parchment to prevent sticking and place in an airtight container at room temperature. The candy stays fresh for up to two weeks-perfect for gifting or savoring slowly. For longer storage, freeze wrapped pieces in a sealed bag; thaw at room temperature before serving to preserve softness. Sharing your homemade treasures wrapped in rustic kraft paper or charming mason jars adds a personal touch, spreading warmth and sweetness to friends and family.
Prep and cook time
- Preparation: 10 minutes
- Cooking/Candying Process: 25-30 minutes
- Cooling and Setting: 30 minutes
Yield
About 40 small pieces (1-inch squares)
Difficulty Level
Medium – requires attention and candy thermometer use
Ingredients
- 2 cups pure Grade A Dark amber maple syrup
- Optional natural add-ins: 1/4 cup toasted chopped pecans or walnuts, 1/2 tsp ground cinnamon, 1/4 tsp sea salt flakes, 1 tsp pure vanilla extract
- Butter, for greasing the cooling surface
Instructions
- Lightly butter a marble slab or line a rimmed baking sheet with parchment paper and butter it thoroughly to prevent sticking.
- Pour the maple syrup into a heavy-bottomed saucepan and set over medium-high heat. Attach a candy thermometer to the pan, ensuring it doesn’t touch the bottom.
- Bring syrup to a rolling boil while stirring gently to prevent scorching. Continue boiling until the thermometer reads 234°F to 240°F (firm-ball stage).
- Immediately remove from heat and pour the hot syrup onto the prepared surface.
- Let the syrup cool undisturbed for 3-5 minutes, until it thickens slightly but remains warm enough to handle.
- Begin stirring vigorously with a wooden spatula or paddle. This step is vital-stir continuously to aerate and crystallize the syrup into creamy candy. Stir for about 10-15 minutes or until the mixture becomes opaque and firmer.
- If using add-ins (nuts, spices, vanilla), fold them in carefully right before the candy firms too much.
- Quickly pour or spread the candy into an even layer about 1/2-inch thick if on a baking sheet,or shape it into a slab.
- Allow the candy to cool completely, approximately 20-30 minutes.
- Once set, cut into bite-sized squares or shapes using a sharp knife or cookie cutters. Wrap pieces individually for storage.
Chef’s Notes
- Temperature accuracy: Use a reliable candy thermometer for the best results-temperature precision makes or breaks the texture.
- don’t rush cooling: Allow syrup to thicken slightly before stirring; too early and the candy won’t aerate properly, too late and it’ll harden.
- flavor variations: try infusing the syrup with a cinnamon stick during heating or a few dried lavender buds for a floral twist-strain before boiling.
- Make-ahead tip: Maple candy can be made 2 weeks in advance and stored well, making it a fantastic gift option.
- Substitutions: For a softer texture, slightly reduce cooking temperature to the lower end of the firm-ball stage; avoid adding corn syrup as it alters authenticity.
Serving Suggestions
Present this classic homemade maple candy on a wooden serving board, embellished with fresh evergreen sprigs or crystallized maple leaves for a festive touch. Pair with a warm cup of black tea or fresh whipped cream-topped coffee to complement the candy’s sweetness. For a nostalgic charm, serve alongside homemade oatmeal cookies or buttery shortbread to create a cozy, comforting spread.
| Nutritional Info (per 3-piece serving) | Amount |
|---|---|
| Calories | 110 kcal |
| Protein | 0.1 g |
| Carbohydrates | 28 g |
| Fat | 0.0 g |

Discover more time-honored recipes to complement your candy creation in our Classic Maple desserts collection, or learn the intriguing history behind maple syrup’s unique regional expressions on Natural Resources Canada’s official guide.
Q&A
Q&A: Sweet Traditions – Crafting Classic Homemade Maple Candy
Q1: What makes maple candy a cherished treat in customary sweet-making?
A1: Maple candy is more than just a sugary delight; it’s a nostalgic journey back to simpler times. Crafted from pure maple syrup, it captures the essence of early harvests and the heartwarming rituals of tapping maple trees. This candy embodies heritage, community gatherings, and the natural sweetness of the forest, making it a beloved classic that connects generations.
Q2: How does homemade maple candy differ from store-bought versions?
A2: Homemade maple candy offers an authentic taste forged by patient hands and attentive care. Unlike mass-produced varieties that may include additives or artificial flavors, homemade versions use 100% pure maple syrup, boiled gently to lock in its deep caramelized notes. The process allows for customization in texture and sweetness, delivering a personal, artisanal experience you can savor.
Q3: What are the essential ingredients for making classic maple candy?
A3: The true secret to classic maple candy lies in simplicity. All you need is pure maple syrup-preferably Grade A for its rich flavor-and sometimes a pinch of cold water to help control the boil. That’s it! No need for refined sugars, preservatives, or complicated additives. This purity is what gives maple candy its signature smooth,buttery finish.
Q4: Can you describe the step-by-step process of crafting homemade maple candy?
A4: Certainly! Begin by gently boiling pure maple syrup until it reaches the “soft ball” stage (approximately 235°F to 240°F).This transforms the syrup into a thick, syrupy paste. Afterward, pour the hot syrup onto a cold marble slab or buttered surface to cool slightly.Then, stir it briskly to promote creamy crystallization. Once it clouds and thickens, shape the warm mixture into small squares or traditional diamond shapes. The result is a melt-in-your-mouth confection that encapsulates the sweetness of the maple woods.
Q5: What tips can help ensure the perfect texture and flavor?
A5: Precision and timing are key. Use a reliable candy thermometer to monitor temperature accurately-too low, and the candy will be sticky; too high, and it becomes brittle. Stirring at the right moment is crucial to developing the creamy, fudge-like texture. Also, working quickly once off the heat helps form ideal crystallization. Lastly, choosing fresh, high-quality maple syrup guarantees that fragrant, deep maple flavor essential to any good batch.
Q6: Are there fun ways to personalize your homemade maple candy?
A6: Absolutely! while traditional maple candy shines in its simplicity, you can experiment with subtle additions like a sprinkle of sea salt for a sweet-salty balance or a hint of vanilla to enhance warmth. Another creative touch is swirling in finely chopped nuts or dried cranberries for texture and seasonal flair.Just remember, the maple syrup should remain the star.
Q7: What makes maple candy a meaningful gift or family project?
A7: Maple candy carries with it stories of nature’s bounty and familial love. Crafting it together offers a hands-on connection to heritage and the land, creating memories far sweeter than the candy itself. Wrapped in wax paper or simple parchment tied with rustic twine,homemade maple candy becomes a heartfelt gift-a tangible piece of tradition and warmth to share with friends and loved ones.
Q8: Where can one find the best maple syrup for making candy?
A8: For the freshest, most flavorful maple syrup, look for local producers during maple season-typically late winter to early spring-or trusted specialty stores. opt for Grade A Amber or Dark syrup as these varieties provide the robust, rich flavor ideal for candy-making. Supporting local syrup-makers also keeps alive the sweet traditions you’re celebrating in each batch.
Enjoy your sweet adventure into crafting the timeless delight of homemade maple candy-the perfect blend of nature, skill, and tradition!
Wrapping Up
As the last piece of golden maple candy melts slowly on your tongue, you’re reminded that this sweet tradition is more than just a treat-it’s a taste of heritage, patience, and simple pleasures. Crafting classic homemade maple candy invites you to connect with nature’s bounty and celebrate time-honored methods passed down through generations. Whether shared around a cozy kitchen table or gifted to loved ones,these delicate confections carry stories folded into every sugary swirl. So next time the maple sap starts to flow, embrace the art of candy making and let each handcrafted bite become a delicious link in your own sweet tradition.