

When the summer sun blazes and the heatwaves roll in, nothing hits the spot quite like a cold, sweet treat that both refreshes and delights.Enter DIY yogurt popsicles-a playful fusion of creamy texture, tangy flavor, and endless customization that’s as fun to make as it is to eat. In this article, we’ll dive into the art of crafting your own chilled masterpieces at home, revealing tips, tricks, and creative flavor ideas that transform simple ingredients into delightful popsicle perfection. Whether you’re a kitchen novice or a seasoned foodie, prepare to chill and thrill with every bite!
Chill & Thrill: How to Make DIY Yogurt Popsicles at Home
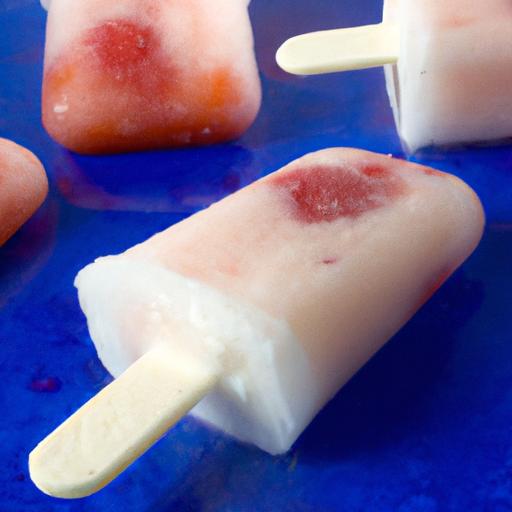
Chill & Thrill: How to Make DIY Yogurt Popsicles at Home transforms simple ingredients into a refreshing treat that’s perfect for beating the heat. Yogurt popsicles,with their creamy texture and tangy-sweet flavor,have roots in many cultures where yogurt has been a beloved staple for centuries. This DIY version brings the delightful nostalgia of summer snacking right into your kitchen-easy, fun, and infinitely customizable.
Getting your popsicles to a lush creaminess and perfect pop texture depends on selecting the right ingredients and mastering the blending and freezing techniques.Whether you’re looking to keep it classic or add a burst of fruity creativity, these tips and tricks will ensure every bite is a smooth, delicious delight.
Prep and Cook Time
- Preparation: 15 minutes
- Freezing Time: 4-6 hours (or overnight)
Yield
Makes 8 standard-sized popsicles
Difficulty Level
Easy
Ingredients
- 2 cups full-fat Greek yogurt (for creaminess and tang)
- ½ cup pure honey or maple syrup (natural sweetener)
- 1 teaspoon pure vanilla extract (for aroma and depth)
- 1 cup fresh mixed berries (blueberries, raspberries, strawberries), halved if large
- 1 small ripe banana (optional for smooth texture and natural sweetness)
- Juice of ½ lemon (for brightness and to balance sweetness)
- Optional add-ins: 2 tablespoons chia seeds, chopped mint leaves, or toasted coconut flakes
Instructions
- Prepare your fruits. Rinse berries and pat dry. If using large berries or fruits, chop into smaller bite-sized pieces for even distribution in each popsicle.
- Blend the base. In a blender, combine the Greek yogurt, honey, and vanilla extract. Add the lemon juice to ensure the popsicles have a vibrant zing that balances sweetness perfectly.
- add fruit and blend. For a fully smooth popsicle, add the banana and half of the berries to the blender and pulse until creamy. If you prefer popsicles with fruit chunks, reserve the remaining berries to layer later or gently stir them in after blending.
- Sweetness and texture test. Taste your yogurt mixture-adjust with extra honey if you like it sweeter. The banana adds natural creaminess,but for thicker popsicles,add a teaspoon of cornstarch or a tablespoon of coconut milk now.
- Layer creatively. Pour a few tablespoons of the yogurt mixture into popsicle molds, add a few whole berries or chia seeds, then fill with more mixture. Use a skewer to swirl gently for marbled effects.
- Freeze with care. Insert sticks and freeze upright for at least 4 hours or overnight. To avoid iciness, cover the molds tightly with plastic wrap or an airtight lid to minimize freezer burn.
- Demold smartly. To release, dip molds in warm water for 10-15 seconds – avoid soaking-to keep the popsicles perfectly smooth and intact.
Tips for Success: Mastering the Art of Blending and Sweetening
- Use full-fat Greek yogurt for that irresistible creamy texture. Low-fat versions freeze harder and icier.
- Natural sweeteners like honey or maple syrup melt easily into the yogurt for an even sweetness without overpowering the tanginess.
- Don’t over-blend if you want textural contrast with fruit chunks; gentle folding keeps pops lively and colorful.
- add acidity carefully. Lemon juice brightens the flavor but too much can toughen the freeze.
- Play with mix-ins. Chia seeds swell and add a fun bite, while mint or toasted coconut flakes lift the flavor profile to gourmet snacking.
- Freeze with airtight lids or tight wrap to prevent ice crystals-this keeps your yogurt popsicles silky smooth.
Creative twists to Elevate Your Yogurt Popsicles with Fruits and Add-Ins
Try layering pureed mango with coconut yogurt for a tropical vibe or swirl raspberry coulis into vanilla yogurt for dramatic color and bursts of flavor. adding finely chopped pistachios or a drizzle of dark honey atop the pops before freezing adds visual appeal and a delightful crunch. For a refreshing herbal note, muddle fresh basil, lavender, or thyme into the yogurt base before freezing. These subtle twists invite you to personalize your popsicle experience and impress guests with seasonal inspirations.
Step-by-Step Freezing Techniques for Popsicles That Stay Perfectly Smooth
The secret to perfectly smooth yogurt popsicles lies beyond ingredients-it’s in the freeze. Slow freezing promotes finer ice crystals, mimicking the texture of ice cream. Place your molds in the coldest part of your freezer, avoid opening the door frequently, and if possible, pause the freezing halfway to stir or flip the molds gently to break up coarse crystals. Covering molds tightly also locks moisture in, preventing freezer burn and iciness. When ready, a brief warm water dip releases pops perfectly without melting or cracking.
Serving Suggestions
Present your yogurt popsicles on a rustic wooden board with edible flowers or sprigs of fresh herbs. Serve with a side of mixed berries or a drizzle of honey for added flair. For kids, use colorful paper straws or decorative napkins to brighten the table. Hosting a summer brunch? Pair popsicles with chilled fruit salads or light sorbets for a complete cooling spread. These popsicles also make delightful after-dinner treats with a sprinkle of toasted nuts or a dusting of cinnamon.

| Nutrient | Per Popsicle (approx.) |
|---|---|
| Calories | 90 |
| Protein | 5 g |
| Carbohydrates | 12 g |
| Fat | 2.5 g |
For more delightful frozen treats, check out our homemade fruit ice pops guide. Expand your summer dessert repertoire and explore the science behind perfect frozen textures by visiting Serious Eats.
Q&A
Q&A: Chill & Thrill – How to Make DIY Yogurt Popsicles at Home
Q1: What makes yogurt popsicles a great homemade treat?
A1: Yogurt popsicles combine the creamy tang of yogurt with the refreshing chill of a frozen treat, making them both delicious and nutritious. They’re easy to customize, packed with probiotics, and perfect for cooling down on a hot day without the sugar overload of many store-bought pops.
Q2: Can I use any type of yogurt for making popsicles?
A2: Absolutely! Greek yogurt gives your popsicles a thick,creamy texture,while regular or flavored yogurts can add variety and sweetness. Just make sure to choose yogurt with a consistency that’s smooth enough to blend well with your mix-ins.
Q3: What are some fun and healthy mix-ins to add to yogurt popsicles?
A3: Fresh fruits like berries, mango, and kiwi add natural sweetness and bursts of color. You can also swirl in a bit of honey or maple syrup for extra flavor,or sprinkle chia seeds and crushed nuts for texture and a nutritional boost. Just be mindful of the popsicle molds’ space!
Q4: How do I prevent my popsicles from becoming icy rather of creamy?
A4: The key is balancing the yogurt with creamy ingredients like blended bananas or a splash of coconut milk. These add natural sugars and fats that keep the texture smooth and prevent ice crystals from dominating the popsicle.
Q5: What’s the best way to layer flavors or create swirls in yogurt popsicles?
A5: Pour a spoonful of one flavor, then add a contrasting color or flavor on top and gently swirl with a toothpick or skewer. This creates visually appealing layers and a taste surprise in each bite!
Q6: How long do homemade yogurt popsicles need to freeze?
A6: For perfectly firm popsicles, freeze them for at least 4-6 hours. Overnight freezing is ideal if you want to prepare in advance-just pop them out and enjoy whenever you need a rapid chill and thrill!
Q7: Can kids safely make these popsicles at home?
A7: Definitely! Yogurt popsicles are a fun, hands-on activity that kids can help with-from stirring and layering to choosing mix-ins-under light supervision. Plus, it’s a sneaky way to encourage them to eat more yogurt and fruit.
Q8: What’s a simple recipe to start with for these popsicles?
A8: Blend a cup of Greek yogurt with a cup of fresh berries and a tablespoon of honey. pour into popsicle molds, insert sticks, and freeze for 4-6 hours. Voilà-a creamy, fruity treat ready to chill and thrill your taste buds!
Q9: Can I customize yogurt popsicles for dietary needs?
A9: Yes! Use dairy-free yogurt alternatives like coconut or almond milk yogurt for lactose intolerance or vegan diets. Adjust sweeteners as needed, and look for natural, allergen-pleasant mix-ins to suit your household.
Q10: How should I store yogurt popsicles for best flavor and texture?
A10: Keep them in an airtight container or tightly sealed popsicle bags to prevent freezer burn and odor absorption. Label them with the date,and enjoy within 1-2 weeks for peak freshness and flavor.
The Conclusion
Whether you’re seeking a refreshing midday pick-me-up or a delightful treat to share with family and friends, these DIY yogurt popsicles offer the perfect blend of chill and thrill. Simple to make and endlessly customizable, they bring together creamy goodness and vibrant flavors in a way that’s both nourishing and fun. So grab your favourite ingredients, unleash your creativity, and turn your kitchen into a popsicle playground-because enjoying homemade frozen delights has never been this cool or this rewarding!