There’s something irresistibly enchanting about the whimsical world of dirt pudding cups-a playful blend of creamy chocolate,crumbly cookie “soil,” and quirky gummy “critters” that transforms a simple dessert into a mini edible adventure. Whether you’re planning a lively kids’ party, seeking a nostalgic treat, or simply craving a fun twist on pudding, dirt cups offer a delightful way to dig into dessert. In this guide, we’ll explore the origins, creative variations, and tasty tips to help you craft these charming, crowd-pleasing treats that are as enjoyable to make as they are to eat. Get ready to roll up your sleeves and dig into deliciousness!
Choosing the Perfect Ingredients for Your Dirt pudding Cups
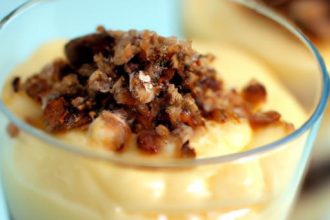
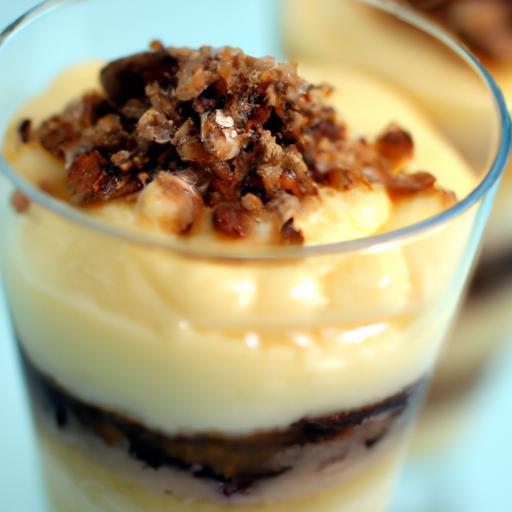
Dig Into Dirt Pudding Cups with the freshest, most vibrant ingredients to create a sensory experience that’s as visually fun as it is delicious. The classic dirt cup thrives on the contrast of creamy pudding and crumbly cookie “soil,” but selecting high-quality components elevates this nostalgic treat from simple snack to standout dessert. Start with a rich-yet smooth-chocolate pudding base; using homemade pudding or a premium boxed mix can add a silky texture that feels indulgent on every spoonful.
For that authentic “dirt” effect,crushed chocolate sandwich cookies are your go-to,ideally with just the right blend of cookie and cream filling. Opt for cookies that crumble easily without turning to powder, which helps achieve realistic soil texture. Fresh gummy worms are the whimsical stars of presentation-choose luminous, plump ones for a playful surprise that delights both kids and kids-at-heart.
Don’t hesitate to add subtle flavor boosts like a touch of espresso powder in your pudding to deepen the chocolate flavor or a hint of vanilla extract for complexity. Incorporating crushed nuts or mini chocolate chips provides a surprising crunch, while edible flowers or candied mint leaves can add a visually stunning, fresh note.
Creative Twists That Elevate the Classic Dirt Cup Experience
Your Dirt Pudding Cups come alive through inventive tweaks that make them truly unique. Try layering with peanut butter or cream cheese whipped into the pudding for a luscious, tangy twist. For a healthier spin, swap traditional pudding for Greek yogurt blended with cocoa powder and a drizzle of honey-still creamy and indulgent but with a protein boost.
Introduce textural surprises like crushed pretzels or toasted coconut flakes scattered amidst the “dirt.” For a colorful festive take, use pastel candies or mini marshmallows nestled in the layers. A sprinkle of edible gold dust or shimmer powder on top can transform each cup into a dazzling party centerpiece.
Don’t overlook the containers-serve your creation in mason jars, mini terracotta pots (lined, of course), or clear cups to show off every decadent layer. add personalized flags or mini shovels on toothpicks for extra charm.
Step by step Guide to Assembling Irresistible Dirt Pudding Cups
- Prepare the pudding: If using instant pudding mix, whisk according to package instructions until thick and smooth. For homemade pudding, ensure it’s fully chilled for best texture.
- Crush the cookies: Place chocolate sandwich cookies in a sealable bag and gently crush with a rolling pin to achieve a mix of fine crumbs and small chunks. Set aside.
- Layer the base: Spoon a generous layer of pudding into your chosen cups, smoothing the surface with the back of a spoon.
- Add “dirt” layer: Sprinkle 2-3 tablespoons of crushed cookies atop the pudding, evenly covering the surface.
- Repeat layering: Alternate pudding and cookie layers until the cup is almost full, pressing lightly to compact layers without mixing.
- top it off: Finish with a final layer of cookie crumbs, then nestle gummy worms on top, letting them peek out of the “soil” for maximum whimsy.
- Chill: Refrigerate for at least 30 minutes to let the layers meld perfectly and the pudding firm up slightly, enhancing texture and flavor harmony.
Tips for Serving and Storing Your Delicious Dirt Treats
Serve your Dirt Pudding Cups chilled, straight from the fridge, with small spoons to scoop through the layers of creamy and crumbly bliss. For presentation, scatter a few extra gummy worms and chocolate shavings on serving trays to invite curiosity and smiles.
To keep your desserts fresh and moist, cover each cup tightly with plastic wrap or lids if using mason jars. Stored properly, they maintain peak taste and texture for up to 3 days. avoid freezing, as the pudding may separate and the cookies will lose their crunch.
If transporting, pack cups upright in a container with snug compartments to prevent shifting. For large gatherings, assemble cups a few hours in advance and refrigerate to let flavors harmonize seamlessly.
Prep and Cook Time
- Prep Time: 15 minutes
- Cook time: 0 minutes (plus chilling time)
Yield
- Serves 6-8 Dirt Pudding Cups (depending on cup size)
Difficulty Level
- Easy – Perfect for all ages and skill levels
Ingredients
- 2 cups cold milk (for pudding)
- 1 package (3.9 oz) instant chocolate pudding mix
- 24 chocolate sandwich cookies (e.g.,Oreos),crushed
- 12-16 gummy worms
- 1 tsp vanilla extract (optional)
- 1 tsp instant espresso powder (optional,for richer chocolate flavor)
- 2 tbsp mini chocolate chips or crushed nuts (optional for texture)
Instructions
- In a medium bowl,whisk pudding mix and cold milk together for 2 minutes. Add vanilla extract and espresso powder if using. Chill until set.
- Place cookies in a resealable bag and crush gently using a rolling pin until a mix of crumbs and chunks form.
- In clear cups, add ¼ cup pudding as the first layer. Smooth it out evenly.
- Sprinkle 2 tablespoons of cookie crumbs over the pudding.
- Repeat layers of pudding and crushed cookies until cups are almost full,ending with cookie crumbs on top.
- Decorate with gummy worms, tucking some partially beneath cookie crumbs for a creepy-crawly effect.
- Refrigerate for at least 30 minutes before serving to meld flavors and set texture.
Chef’s Notes
- Make-Ahead: Dirt pudding cups keep well up to 3 days refrigerated, making them ideal for parties or festive presents.
- Substitutions: For a dairy-free option, use coconut or almond milk pudding mixes.
- Texture Tips: avoid pulverizing cookies too finely; varied crumb sizes mimic authentic soil.
- Flavor Boost: A pinch of cinnamon or chili powder in cookie crumbs adds an unexpected warmth.
Serving Suggestions
- Present in mini mason jars or clear plastic cups to showcase layers.
- Garnish top with extra candy worms, chocolate shavings, or edible flowers for flair.
- Serve with a small shovel-shaped spoon for thematic fun at kids’ parties.
- Pair with a scoop of vanilla ice cream or a drizzle of caramel sauce for an indulgent twist.
| Nutrient | Per Serving (1 Cup) |
|---|---|
| Calories | 280 |
| Protein | 4g |
| Carbohydrates | 42g |
| Fat | 10g |

For more creative desserts that bring smiles to the table, explore our Sweet Treats for Family Gatherings collection. Learn about the science of pudding texture at Serious Eats to perfect your own Dirt Pudding Cups every time.
Q&A
Q&A: Dig Into Dirt Pudding Cups: A Fun & Tasty Treat Guide
Q1: what exactly are Dirt Pudding Cups?
A1: Dirt Pudding Cups are whimsical desserts that mimic a mini garden in a cup. They typically consist of creamy chocolate pudding layered with crushed chocolate cookies to resemble dirt,topped off with gummy worms,candy flowers,or edible “bugs” for that playful garden vibe. It’s a fun treat that delights kids and adults alike!
Q2: How can I make Dirt Pudding Cups at home?
A2: Making Dirt Pudding Cups at home is a breeze! Start with your favorite chocolate pudding-homemade or store-bought. Crumble some chocolate sandwich cookies (like Oreos) over the pudding to create the “dirt” layer. Then, decorate with gummy worms, edible flowers, mini candy vegetables, or even a sprinkle of crushed nuts for texture. Chill before serving for the best experience.
Q3: are there creative twists to the traditional Dirt Pudding Cup?
A3: Absolutely! You can swap chocolate pudding for vanilla or butterscotch for a different flavor base. Try mixing in mashed bananas or peanut butter for a new taste dimension.For toppings, use crushed candy bars, fruit pieces like strawberries or blueberries, or even mini marshmallows shaped like clouds or critters. Let your inventiveness grow as wildly as a garden!
Q4: What themes work well with Dirt Pudding Cups?
A4: Dirt Pudding cups fit perfectly into garden-themed parties, springtime celebrations, Halloween festivities, or nature-inspired events. They’re also a fantastic hands-on activity for kids during a science lesson about soil,worms,and the habitat. Customize the decorations to match any party theme for a delightful and edible centerpiece.
Q5: Can Dirt pudding Cups be made vegan or dairy-free?
A5: Yes, they can! Use dairy-free chocolate pudding made from coconut, almond, or oat milk. Look for vegan chocolate cookies, or crush up vegan chocolate biscuits. Choose gummy candies free from gelatin, or use fresh fruit and edible flowers as natural decorations. These swaps keep the treat inclusive without sacrificing any of the fun or flavor.
Q6: How long do Dirt Pudding Cups last, and how should I store them?
A6: Dirt Pudding Cups are best enjoyed within 2-3 days when kept refrigerated. store them in airtight containers or cover tightly with plastic wrap to prevent the crushed cookie layer from becoming soggy. For the freshest “dirt” texture, add the cookie crumbs just before serving if possible.
Q7: What makes Dirt Pudding Cups so popular with kids?
A7: Kids love Dirt Pudding Cups because they satisfy their sweet tooth and their curiosity! The dessert looks like something they can dig into,play with,and even create themselves. Gummy worms and candy critters add a playful element, making dessert time interactive and imaginative-a perfect recipe for smiles and giggles.
Q8: Can Dirt Pudding Cups be made allergen-friendly?
A8: Definitely! To accommodate allergies,use pudding mixes free from common allergens like nuts or gluten. Substitute with gluten-free cookies or crushed cereals, and use fruit toppings rather of candies containing nuts or artificial dyes. There are plenty of allergen-conscious brands available, making it easy to customize and keep everyone happy and safe.
Q9: Are there any benefits to involving kids in making Dirt Pudding Cups?
A9: Involving kids in the process encourages creativity, fine motor skills, and even a bit of science curiosity as they learn about soil and critters. Plus, it’s a joyful bonding activity that teaches patience and the enjoyment of making something delicious from scratch. The pride in their edible creation often makes for a more eager appetite!
Enjoy digging into your delicious, delightfully dirty dessert adventure!
wrapping Up
Whether you’re delighting kids at a birthday party, crafting a whimsical dessert for family gatherings, or simply indulging your own sweet tooth, dirt pudding cups are a playful and delicious treat that never fails to bring a smile. By blending rich chocolate pudding, crunchy cookie crumbs, and a sprinkle of gummy worms, you create not just a dessert-but a mini adventure in every bite. So don your apron,get creative with your ingredients,and dig into this dirt dessert that’s as fun to make as it is to eat. Happy digging!