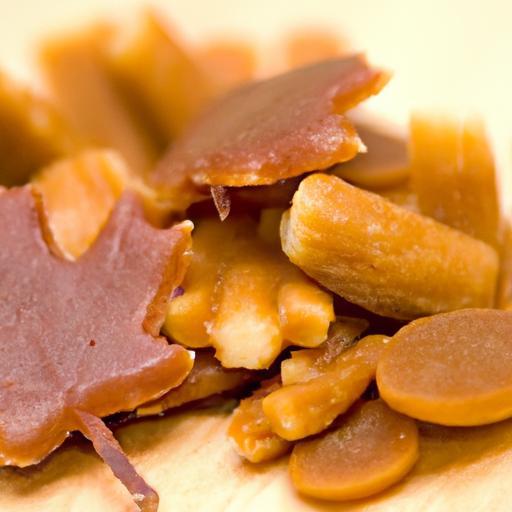
There’s something magically nostalgic about the rich, amber sweetness of maple candy-a treat that captures the essence of crisp forest air and rustic charm in every bite. Long before store shelves were lined with glossy packages, families gathered around warm stoves and bubbling kettles, transforming pure maple syrup into delicate confections that melt effortlessly on the tongue. in this article, we dive into the timeless art of crafting homemade maple candy, revealing how a few simple ingredients and a touch of patience can turn your kitchen into a cozy haven of sweet traditions. Whether you’re a seasoned sugar maker or a curious beginner, prepare to embark on a delicious journey that celebrates both heritage and homemade goodness.
Sweet Traditions: Crafting Homemade Maple Candy at Home begins with embracing the time-honored process of tapping maple trees, a practice that captures the very essence of early spring and nature’s sweetest gift. There’s something profoundly satisfying about collecting your own fresh sap, feeling the crisp air, and knowing that this raw liquid gold will transform into velvety maple candy on your kitchen stove.
Prep and Cook Time
- Readiness: 30 minutes (plus sap collection time)
- Boiling/Cooking: 1 to 1.5 hours
- Cooling and Setting: 20-30 minutes
Yield
Approximately 40 small pieces (serving size: 10)
Difficulty Level
Medium – Requires attention during boiling, but rewarding and beginner-pleasant with proper guidance
Ingredients
- 2 quarts fresh maple sap (or 100% pure maple syrup, Grade A, if sap unavailable)
- 1/4 teaspoon baking soda
- Optional flavor additions: vanilla extract, cinnamon, or finely chopped nuts
- Decorative finishes: edible gold flakes, toasted coconut flakes, or a sprinkle of sea salt
Instructions
- Collecting sap: Select healthy sugar maple trees in early spring when temperatures swing above and below freezing. Drill a 7/16-inch hole about 2-3 feet up the trunk. Insert a spile, hang a clean bucket, and collect sap daily, ideally in the morning for best freshness.
- Filtering sap: Strain the sap through a fine mesh or cheesecloth promptly after collection to remove bark and impurities.
- Boiling: Pour the filtered sap into a large, heavy-bottomed pot. Bring to a rolling boil over medium-high heat. Watch carefully as the volume reduces-you’ll need to boil down roughly 40 gallons of sap into 1 gallon of syrup for pure syrup, but for candy, you can start with sap or syrup depending on availability.
- Adding baking soda: When the sap reaches about 7°F above the boiling point of water (approx. 219°F at sea level), add the baking soda slowly. It will foam vigorously-this step balances acidity and improves texture.
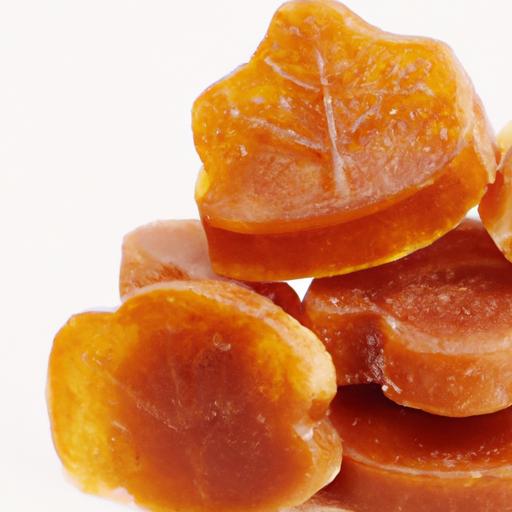
- Reaching candy temperature: Boil until the mixture reaches 238°F (soft ball stage).Use a candy thermometer for precision. This stage is key to achieving the classic creamy maple candy texture.
- Cooling: Remove the pot from heat immediately. Let it cool undisturbed to around 110°F for 15-20 minutes; this resting phase allows crystallization to start.
- Beating the candy: Using a wooden spoon or hand mixer, beat vigorously until the mixture thickens, becomes opaque, and starts to look grainy-this process locks in the smooth texture.
- Flavor additions (optional): At this stage, gently fold in vanilla, cinnamon, or finely chopped nuts for creative flair.
- Molding: Quickly pour or spoon the candy onto parchment-lined trays in small squares or use candy molds for uniform shapes.
- decorative finishes: While still slightly sticky, sprinkle edible gold flakes, toasted coconut, or a dusting of flaky sea salt for an elegant presentation.
- setting: let the candy cool fully at room temperature for 20-30 minutes before serving or packaging.
Tips for Success in Crafting Maple Candy
- Use a high-quality candy thermometer to monitor temperature carefully-precision is everything for the perfect texture.
- If sap isn’t accessible, pure Grade A maple syrup can be a reliable shortcut without sacrificing authentic flavor.
- When adding baking soda, stir gently to prevent boiling over-patience is key during this foaming stage.
- Beat candy vigorously but avoid overworking it; the perfect consistency is creamy and smooth but firm enough to hold shape.
- Make ahead and store your finished maple candy in an airtight container at cool room temperature-candy will keep fresh for weeks.
- Experiment with subtle spice infusions like cardamom or nutmeg for a seasonal twist.
Serving Suggestions
Present your homemade maple candy on a rustic wooden board alongside fresh spring blossoms or evergreen sprigs for a nostalgic,woodland feel. Garnish with delicate edible flowers or dust with powdered sugar for a snowy effect. Pair the sweet treats with lightly brewed herbal teas or coffee to balance the rich maple notes beautifully. For festive occasions, tie small batches in parchment paper with twine and attach a handwritten tag detailing the sap’s harvest date-a heartfelt gift straight from nature.
| Nutritional Info (per piece) | Amount |
|---|---|
| Calories | 55 kcal |
| Protein | 0.1 g |
| Carbohydrates | 14 g |
| Fat | 0 g |

For a deeper dive into tapping techniques, check out our complete tapping guide, and to understand the science behind sugar crystallization, visit this USDA resource on maple syrup production.
Q&A
Q&A: Sweet Traditions – Crafting Homemade Maple Candy at Home
Q1: What makes maple candy a timeless treat?
A1: Maple candy is a delicious embodiment of autumn’s golden harvest and winter’s cozy charm. Made from pure maple syrup, it captures the essence of the forest’s sweetest gift, transforming tree sap into a melt-in-your-mouth delight that has warmed hearts for generations.
Q2: Is it difficult to make maple candy at home?
A2: Not at all! With just a few simple ingredients and some patience, you can craft your own batch of maple candy. The process is as much about the experience-the sweet aroma filling your kitchen and the anticipation of that first bite-as it is indeed about the final product.
Q3: What ingredients do I need to make maple candy?
A3: The magic begins with pure,grade A maple syrup. That’s the star ingredient. Alongside it, you’ll need a bit of cold water to help with the cooking process and, if you like, a pinch of salt to balance the sweetness. Some recipes suggest a touch of butter for extra creaminess, but pure maple syrup alone shines beautifully.
Q4: How do I know when the maple syrup is ready to become candy?
A4: The key is temperature. Using a candy thermometer, heat your maple syrup until it reaches approximately 235°F to 240°F (113°C to 116°C)-the soft ball stage. This precise temperature ensures your candy will have that perfect, fudgy texture rather then being too sticky or too hard.Q5: Can I add flavors or mix-ins to my maple candy?
A5: Absolutely! While classic maple candy is splendid in its pure form, you can get creative by incorporating natural flavors like vanilla or cinnamon. Some even fold in chopped nuts such as walnuts or pecans for a delightful crunch. Just remember, simplicity ofen highlights the true essence of the maple flavor.
Q6: What’s the best way to shape and store homemade maple candy?
A6: Once the syrup reaches the right temperature,pour it onto a cold,greased marble slab or a baking sheet lined with parchment paper.Allow it to cool just enough to handle, then use a spatula or knife dipped in cold water to cut it into squares or bars. Store your candy in an airtight container at cool room temperature to keep it fresh and chewy.
Q7: how can I troubleshoot common issues in maple candy making?
A7: If your candy comes out too soft or sticky, it likely didn’t reach a high enough temperature. Too hard or brittle? It may have been cooked too long or at too high a heat. Patience and precise temperature control are your best allies. using a reliable candy thermometer is essential for success.
Q8: Besides enjoying it as a sweet snack, are there other fun ways to use maple candy?
A8: Maple candy’s rich flavor shines in many creative ways. try shaving it over vanilla ice cream, crumbling it into oatmeal or yogurt, or gifting beautifully wrapped squares to friends and family. It’s a treat that carries warmth, sweetness, and a touch of tradition wherever it goes.
Q9: What’s the cultural significance of maple candy?
A9: Maple candy is more than just a confection; it’s a bridge to North American heritage, reflecting the rhythms of nature and the artisanal craftsmanship passed down through generations-especially in regions where maple sugaring is a cherished seasonal ritual.
Q10: Any final tips for a first-time maple candy maker?
A10: Embrace the process with curiosity and care. Quality maple syrup is your foundation, so invest in the best you can find. Keep your thermometer handy, and don’t rush the cooling phase. Most importantly, savor the moment-making maple candy is a sweet tradition that’s as rewarding as it is delicious.
Concluding Remarks
As the last shimmering piece of maple candy melts on your tongue, you’re reminded that this isn’t just a sweet treat-it’s a connection to time-honored traditions and the warming comfort of home. Crafting maple candy yourself unlocks a delicious chapter of culinary heritage, blending the natural sweetness of pure maple syrup with the joy of hands-on creation. Whether shared with family or savored quietly by the fire, each bite carries the story of maple’s journey from sap to sugar. So next time the season calls for something special, remember: the sweetest traditions are often those made by your own hand.