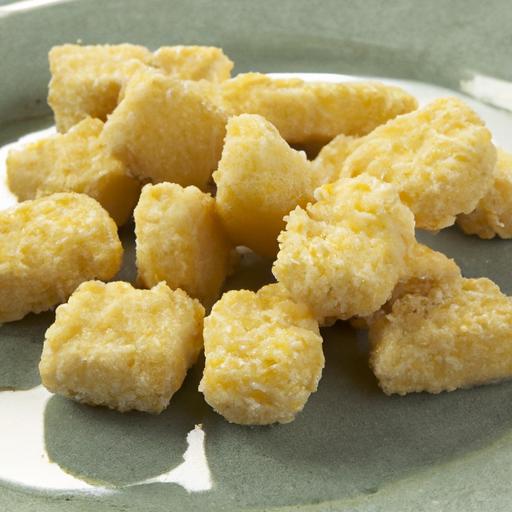
There’s something undeniably magical about the satisfying crunch of fresh cheese curds – that irresistible pop, the creamy center, and the rich, savory flavor that dances on your taste buds. Whether enjoyed as a nostalgic snack from your local farmer’s market or the star ingredient in a comforting plate of poutine, cheese curds hold a special place in the hearts of food lovers everywhere.
But did you no that creating these delightful morsels at home is both simpler and more rewarding than you might think? In this article, we’ll guide you thru the art and science of making perfect cheese curds right in your own kitchen – unlocking the secrets to that ideal texture and flavor that make every bite a crunchy delight. Ready to embark on a cheesy adventure? Let’s get curding!
Crunchy Delight cheese curds evoke the magic of a truly irresistible snack – perfectly golden-on-the-outside, silky and squeaky on the inside. This beloved treat hails from the heart of cheesemaking regions, especially Wisconsin, and making it at home not only guarantees freshness but invites you to master the delicate balance of flavors and textures that define the ultimate crunch. Whether you’re a seasoned foodie or a kitchen adventurer, crafting these homemade cheese curds will become a rewarding ritual that celebrates the art of cheese frying and savoring.
Prep and Cook time
- Preparation: 30 minutes
- Cooking: 10 minutes
- Total: 40 minutes
Yield
Serves 4 as an appetizer or snack
difficulty Level
Medium – Requires careful attention to curdling and frying process
Ingredients
- 1 gallon whole milk (preferably not ultra-pasteurized)
- 1/4 tsp liquid calcium chloride (if using store-bought milk)
- 1/4 tsp mesophilic starter culture
- 1/2 tsp liquid rennet diluted in 1/4 cup cool, non-chlorinated water
- 2 tsp kosher salt (divided)
- Vegetable oil for frying (canola, sunflower, or peanut oil)
- 1/2 cup all-purpose flour (for dredging)
- 1 large egg, beaten (for dredging)
- 1 cup panko breadcrumbs or crushed cornflakes for extra crunch
Instructions
- Heat the Milk: Slowly warm the milk in a heavy-bottomed pot over low heat to 90°F (32°C), stirring gently to avoid scorching. Add calcium chloride now if using store-bought milk to improve curd formation.
- Add Starter Culture: Sprinkle the mesophilic starter evenly over the milk’s surface. Let it hydrate for 2 minutes then stir gently to mix. Cover and allow to incubate for 45 minutes at 90°F, maintaining temperature if possible.
- Introduce Rennet: Stir the diluted rennet steadily into the milk with an up-and-down motion for 30 seconds.Cover the pot and let it set until you get a clean break, about 30-45 minutes.
- Cut the Curd: Using a long knife,cut the curd into 1/2-inch cubes. Let rest for 5 minutes.
- Cook and stir: Slowly heat the curds to 105°F (40°C) over 20 minutes, stirring gently every few minutes to keep the curds from matting together.
- Drain Whey: Pour the curds into a colander lined with cheesecloth. Allow whey to drain naturally for 5 minutes, then sprinkle with 1 tsp salt and toss gently.
- Chill Curd: Transfer curds to a bowl and refrigerate for 1 hour to firm up and develop their signature squeak.
- Prepare for Frying: Heat oil in a deep skillet or fryer to 350°F (175°C). Dredge chilled curds first in flour, then dip in beaten egg, and coat evenly with panko breadcrumbs for that ultimate crunch.
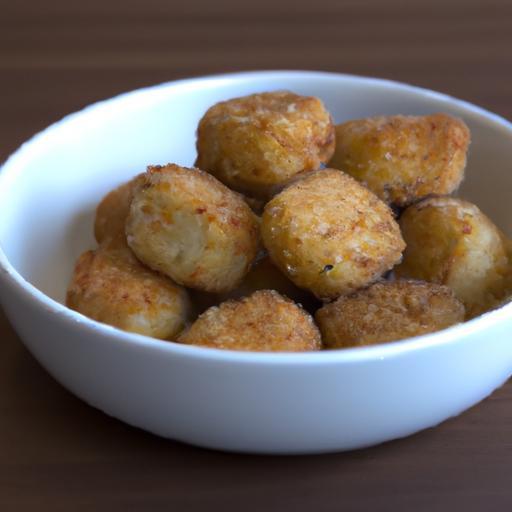
- Fry Curds: Fry curds in batches, about 2-3 minutes each, until golden brown and crispy, turning occasionally. Drain on paper towels and immediately sprinkle with remaining salt.
- Serve Warm: Enjoy your crunchy delight cheese curds hot for the best melt-in-your-mouth experience.
Tips for Success: Mastering the Art of Squeaky Cheese Curds
- Use fresh, high-quality whole milk, avoiding ultra-pasteurized types as they hinder curd formation and texture.
- maintain precise temperatures during incubation and cooking. A digital thermometer is your best friend.
- Don’t rush the curdling time – the clean break test is key to perfect texture.
- For extra crunch, swap panko breadcrumbs with crushed cornflakes or seasoned cracker crumbs.
- if curds aren’t squeaky enough,refrigerate longer or use fresher milk next time.
- Make ahead: Prepare curds a day in advance, keeping them well-covered in the fridge and dredge/fry just before serving.
Creative Serving Ideas to Elevate Your Homemade Cheese Curds
transform your crunch first by pairing them with a selection of dips and toppings that enhance their golden goodness. Serve cheese curds alongside a vibrant spicy sriracha mayo,cool and herby ranch dressing,or tangy mustard aioli. For a rustic yet elegant touch, nestle curds on a bed of fresh arugula, drizzled with honey and cracked black pepper for sweet-savory contrast. Alternatively, stack them atop crispy fries or scatter over a warm baked potato for indulgent comfort food.
For parties, thread fried curds on mini skewers, alternating with cherry tomatoes and fresh basil leaves, then drizzle with balsamic glaze – a visually stunning and palate-pleasing treat. Garnish with a sprinkling of chopped chives or smoked paprika for a burst of colour and an extra layer of flavor.

| nutrient | Per Serving |
|---|---|
| Calories | 320 kcal |
| Protein | 18 g |
| Carbohydrates | 15 g |
| Fat | 21 g |
Ready to explore more homemade cheese adventures? Check out our Complete Guide to Homemade Mozzarella Cheese for another delicious project that complements your cheese curds perfectly.
Q&A
Crunchy Delight: How to Make Perfect Cheese Curds at Home
Q&A
Q1: What exactly are cheese curds, and why are they so beloved?
Cheese curds are the fresh, moist pieces of curdled milk that form the first stage in cheesemaking. They’re famed for their delightful squeak when bitten into-a sign of freshness-and their satisfying crunch. Loved as a snack or a star ingredient in dishes like poutine, cheese curds offer a pure, mild cheese flavor that’s both nostalgic and irresistibly tasty.
Q2: Is it really possible to make cheese curds at home without fancy equipment?
Absolutely! While commercial cheese producers use specialized tools, you can make delicious cheese curds in your own kitchen with just a large pot, a thermometer, a slotted spoon, cheesecloth, and a bit of patience. the magic lies in controlling temperature and timing during milk curdling and draining-perfectly doable with everyday gear.
Q3: What type of milk should I use to make cheese curds?
For the best squeaky, fresh curds, start with high-quality, whole pasteurized milk. Avoid ultra-pasteurized milk, as the heating process alters proteins affecting curd formation. Fresh, local dairy milk-whether from cow or goat-can yield wonderfully rich curds with unique flavor profiles.
Q4: How do I achieve that signature squeak in cheese curds?
The “squeak” comes from the intact protein networks in fresh curds rubbing against your teeth. To preserve that, it’s key to keep the curds fresh and avoid aging them too long. Enjoy them the same day or within a couple of days, refrigerate properly, and eat them at room temperature for maximum squeak.
Q5: Can I add flavors or spices when making cheese curds?
Definitely! While conventional curds are plain, you can infuse subtle flavors by adding herbs like chives or rosemary, or even a pinch of garlic powder right after the curds have formed but before pressing them. Just be gentle-not to overpower the mild, creamy essence of the curds.
Q6: What’s the step-by-step process to turn milk into delightful cheese curds?
Start by heating milk gently, then add a starter culture to encourage acid development. next, introduce rennet to coagulate the milk into curds. Once the curds set, cut them to release whey, gently stir and heat to firm them up, then drain using cheesecloth. After a short rest, they’re ready to enjoy fresh or lightly fried for a crunchy treat.
Q7: Can I freeze homemade cheese curds if I don’t eat them right away?
While freezing is possible, it tends to alter the texture and diminishes the beloved squeak. if you must freeze, wrap curds tightly in airtight containers and thaw them slowly in the refrigerator. for the freshest crunchy experience, however, consuming them fresh is always best.
Q8: How do I know if my curds went wrong during the process?
If your curds turn out rubbery, overly dry, or fail to form properly, it’s likely due to incorrect milk temperature, too much or too little rennet, or insufficient acid development. Temperature control and timing are critical-try adjusting those factors next time and ensure your ingredients are fresh.
Q9: What are some popular ways to enjoy fresh cheese curds at home?
fresh cheese curds make amazing snacks all on their own-try tossing them with a pinch of salt or lightly breading and frying them for a crunchy, melty delight. They also add a creamy pop when sprinkled on salads, stirred into scrambled eggs, or melted atop roasted vegetables.
Q10: Is homemade curd-making a lengthy process?
patience is part of the reward. From start to finish, expect about 4 to 6 hours, including heating, setting, cutting, cooking, and draining. while this may sound time-consuming, much of it is hands-off waiting, making it a perfect weekend kitchen adventure.
Enjoy making your own crunchy cheese curds-each bite a celebration of simple ingredients transformed by careful craft!
Insights and Conclusions
As you savor those golden, crispy cheese curds fresh from your own kitchen, remember that the perfect crunch is more than just a treat-it’s a testament to the art of homemade care and craftsmanship. With a few simple ingredients, a bit of patience, and a dash of culinary curiosity, you’ve unlocked the secret to a snack that’s as addictive as it is indeed satisfying. So next time you crave that irresistible squeak and savory bite, skip the store and embrace the rewarding journey of making your own. After all, nothing beats the joy of biting into a crunchy delight crafted by your own hands. Happy curdling!