There’s something undeniably magical about the first scoop of homemade vanilla ice cream: the way its creamy texture melts effortlessly on the tongue, releasing delicate floral and sweet notes that awaken the senses. Behind this simple pleasure lies a perfect balance of technique, quality ingredients, and a touch of patience-the true art of crafting creamy bliss. In this article, we’ll unravel the secrets of making your own luscious vanilla ice cream from scratch, transforming everyday ingredients into a velvety dessert that’s as comforting as it is indulgent. Whether you’re a seasoned home cook or a curious beginner, get ready to dive into the timeless craft that turns vanilla into pure delight.
Crafting Creamy Bliss: The Art of Homemade Vanilla Ice Cream
Crafting creamy bliss in your own kitchen starts with a deep recognition for each element that contributes to the humble vanilla ice cream. This beloved classic is more than just a dessert-it’s a celebration of texture, flavor, and technique that delights the senses and invites memories of sunlit afternoons and cozy family gatherings. Using premium ingredients and mastering foundational techniques will transform your homemade vanilla ice cream from simple to sublime.
prep and Cook Time
- Readiness: 15 minutes
- Cook Time: 20 minutes
- Chilling Time: 4 hours (or overnight)
Yield
- About 1 quart (4 cups) of luscious vanilla ice cream, serving 6 to 8.
Difficulty Level
- Medium: Ideal for home cooks looking to elevate their dessert skills.
Ingredients
- 2 cups whole milk (preferably organic for creaminess)
- 1 cup heavy cream (for that signature velvety texture)
- 3/4 cup granulated sugar (for balanced sweetness)
- 5 large egg yolks (key to richness and smooth base)
- 1 vanilla bean, split and scraped (or 2 tsp pure vanilla extract)
- Pinch of fine sea salt (to enhance all flavors)
Instructions
- Warm the Dairy: In a medium saucepan, combine the whole milk, heavy cream, and the scraped seeds plus pod of the vanilla bean. Heat gently over medium heat until the mixture is hot but not boiling, about 5 minutes. This infuses the dairy with deep vanilla aroma.
- whisk the Yolks and Sugar: While the dairy heats, vigorously whisk together the egg yolks, sugar, and salt in a heatproof bowl until the mixture is pale and creamy-this aeration is key for a luscious custard base.
- Temper the Eggs: Slowly ladle about one cup of the hot dairy into the egg mixture while whisking constantly to prevent scrambling. This gradual warming prevents curdling and sets the stage for a silky texture.
- Return to Heat: Pour the tempered eggs back into the saucepan with the remaining dairy mixture. Cook over low-medium heat, stirring constantly with a wooden spoon or heat-resistant spatula, until the custard thickens enough to coat the back of the spoon (about 170°F / 77°C). Do not boil.
- Strain and Chill: Remove from heat, discard the vanilla pod, and strain the custard through a fine mesh sieve into a clean bowl. This step ensures an impeccably smooth custard base. Allow the mixture to cool to room temperature, then cover and refrigerate for at least 4 hours or overnight for optimal flavor progress and texture refinement.
- Balance Sweetness and intensity: Before churning, taste the cold custard. If the vanilla or sweetness need adjusting, stir in pure vanilla extract or a touch more sugar in small increments, blending thoroughly.
- Churn to Perfection: Pour the chilled base into your ice cream maker and churn according to the manufacturer’s instructions. This mechanical aeration develops the signature creaminess and freeze quality of superior ice cream.
- Freeze Firmly: Transfer the soft ice cream to an airtight container and freeze for at least 2 hours to allow it to set fully and reach that perfect scoopable texture reminiscent of artisan gelato.
Tips for Success
- Choosing vanilla: A high-quality Madagascar or Tahitian vanilla bean elevates the ice cream’s fragrance dramatically. If using extract, opt for pure vanilla extract rather than imitation.
- egg handling: Use room-temperature eggs for better emulsification and custard consistency.
- Prevent ice crystals: Ensure thorough chilling before churning and seal your container tightly during freezing to avoid freezer burn.
- Dairy alternatives: For a lighter twist, substitute half-and-half for heavy cream, but expect a slightly less rich texture.
- Make-ahead tip: The custard base freezes well before churning, so you can prepare it days ahead.
Serving Suggestions
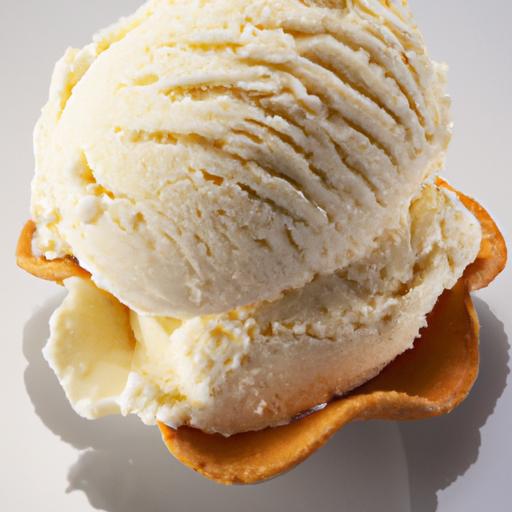
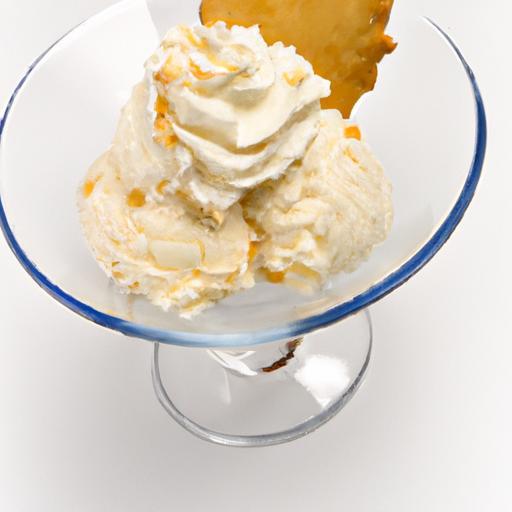
Present your creamy bliss with a flourish: a simple scoop atop a crisp waffle cone or nestled in a delicate bowl. Garnish with toasted vanilla bean pods, fresh berries, or a drizzle of warm salted caramel sauce to amplify the vanilla’s warmth. A sprinkle of finely chopped toasted almonds adds a splendid crunch contrast to the silkiness. pairing with a fresh fruit compote or alongside a warm berry cobbler creates an irresistible harmony of temperatures and textures sure to impress guests.

Nutrition Overview
| Nutrient | Per Serving (1/6 quart) |
|---|---|
| Calories | 280 kcal |
| Protein | 5 g |
| Carbohydrates | 24 g |
| fat | 18 g |
For further reading on the science behind perfect custard textures,explore Serious Eats’ Custard Science. also, for more inspirational frozen dessert recipes, check out our homemade gelato guide.
Q&A
Q&A: Crafting Creamy Bliss: The Art of Homemade Vanilla Ice Cream
Q1: What makes homemade vanilla ice cream different from store-bought varieties?
A1: Homemade vanilla ice cream boasts a rich,velvety texture and an authentic,fresh vanilla flavor that’s frequently enough muted or artificial in store-bought versions. Making it at home allows you to control every ingredient-from the quality of vanilla beans to the sweetness level-resulting in a truly personalized and indulgent treat.
Q2: Why is vanilla considered the classic flavor for ice cream?
A2: Vanilla is celebrated for its subtle yet deeply aromatic profile, which acts as a perfect canvas to showcase the creamy base of the ice cream. Its versatility allows it to shine on its own or play harmoniously with a myriad of toppings and mix-ins, making it a timeless favorite.
Q3: What are the key ingredients needed to craft perfect vanilla ice cream at home?
A3: The essentials are simple: fresh cream, whole milk, sugar, egg yolks, and the star of the show-real vanilla beans or high-quality vanilla extract.These ingredients combine to create a luscious custard base that’s both rich and smooth.
Q4: How does the vanilla bean differ from vanilla extract in ice cream making?
A4: Vanilla beans provide tiny flecks of flavor-packed seeds and impart a more intense, aromatic complexity compared to extract.Using the whole bean infusion with scraped seeds results in a visually appealing ice cream with a vibrant vanilla presence, while extract offers convenience and ease without sacrificing too much character.
Q5: What is the role of egg yolks in vanilla ice cream?
A5: Egg yolks act as natural emulsifiers and thickeners, enriching the custard and fostering that creamy, melt-in-your-mouth texture. they balance the creaminess and prevent ice crystals, ensuring every scoop feels silky rather than icy.
Q6: Can you craft homemade vanilla ice cream without an ice cream maker?
A6: Absolutely! While an ice cream maker simplifies the process by churning and aerating the mixture evenly, homemade vanilla ice cream can be made by periodically stirring the mixture as it freezes.Though it requires more effort, this method can still yield delightfully smooth results if done patiently.
Q7: How can I elevate my vanilla ice cream once the base is perfected?
A7: Once you have that pristine vanilla foundation, possibilities bloom: fold in toasted nuts, swirls of salted caramel, ribbons of fresh berry compote, or sprinkle aromatic spices like cinnamon or cardamom. Each addition turns simple vanilla into a symphony of textures and flavors.
Q8: What are common mistakes to avoid when making homemade vanilla ice cream?
A8: Overheating the custard can curdle the eggs, leading to grainy texture; insufficient chilling before churning often causes icy crystals; and skimping on quality vanilla dulls the flavor. Patience in simmering, cooling, and churning is key to creamy success.
Q9: How long can homemade vanilla ice cream be stored without losing its creaminess?
A9: When properly sealed in an airtight container and stored in the coldest part of your freezer, homemade vanilla ice cream stays deliciously creamy for up to two weeks. beyond that, ice crystals may form, and the texture can suffer.
Q10: what tips can you share for serving homemade vanilla ice cream to highlight its best qualities?
A10: Serve it slightly softened to enhance the creamy mouthfeel and release its fragrant vanilla notes. Pair with fresh fruit, a simple drizzle of honey, or complement it with crunchy elements like toasted almonds to create a delightful contrast of textures and flavors.
Key Takeaways
As the final scoop melts slowly on your tongue, the journey of crafting homemade vanilla ice cream reveals itself not just as a recipe, but as an art form-where patience, passion, and a splash of creativity culminate in creamy bliss. Each batch is a testament to the beauty of simplicity, the elegance of pure ingredients, and the joy of making something truly your own. So, whether you’re a seasoned ice cream artist or a curious beginner, let this timeless treat inspire you to experiment, savor, and share moments of sweet satisfaction straight from your kitchen. After all, the art of vanilla ice cream is more than flavor-it’s an experiance, handcrafted and unforgettable.